Table of contents
Introduction
Running the campaign 2
Story overview 2
Adventure structure 2
Character levels 2
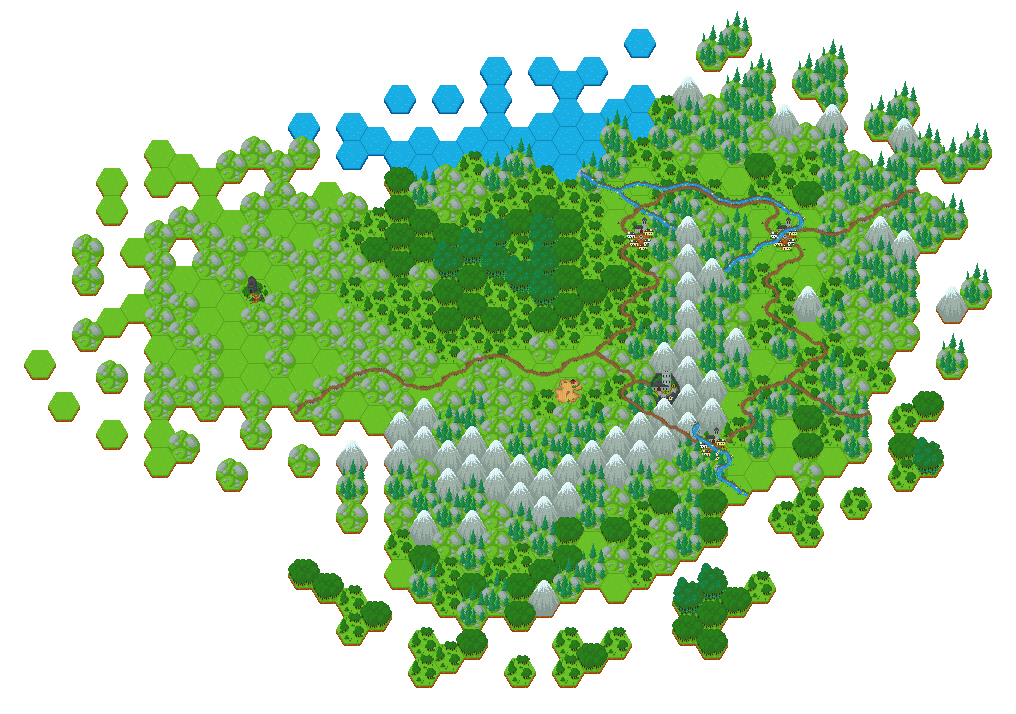
This campaign takes place in the region of Denau in the areas surrounding the City of Denaura.
Cold to the Bones
Chapter 1
Ice and snow chills the bones of those who suffer a life in Denau. This chapter gives you information you need to prepare for the adventurers’ journey into the region. This chapter outlines the history and goals of Elydir the Vanquished so that you’re prepared for what awaits the characters.
Elydir, the Vanquished 2
Elydir is an ancient high-elf wizard. Her hair is grey and face wrinkled; pointed ears poke out under a circlet with a ruby gemstone set, and her robes are a deep dark red with intricate symbols laced in a golden thread.
The circlet is decorated in the image of the sun on a horizon with a downward sword piercing the horizon. The ruby is the sun, spikes of gold show the sun rays, and an iron cruciform is the sword.

Initially, she will be encountered in the Lonely Tower, but will be encountered elsewhere if she is freed.
Elydir’s history 2
Elydir, born Une, was born into nobility in the elven community Aymeluma, the daughter of the elvish Lord Ikanyr Glynlamin. She studied natural magic during the early years of her life.
Promised to the prince Prince Lainot of Rehani to end a enduring war between Aymeluma and Denaura, the young Une was taken from Aymeluma and raised to be the lady consort of Lainot. Lainot was an abusive husband and, after succeeding his father, a feeble violent leader. Through the enduring abuse, Elydir became forlorn and distrustful of humans.
To distract herself from her husband’s abuse, Elydir found solace in the study of magic, especially enchantments. During her study she met Faurin, a kind and generous man. His care lead to devotion and love and intimacy. Together, Elydir and Faurin dreamed of naive grand plans to rule for the betterment of the realm. Elydir, already in a place of power, took these plans more seriously than Faurin. Over the next few years, she started putting plans into place. Her study also took a darker turn, delving into powers for the control of minds and unsavoury creatures. It was then, over 500 years ago, Elydir used these skills to kill Lainot, overthrow government of the Denaura and take control of its people. Yet, for Elydir, despite the power she had amassed, her greed was unfulfilled and her desire for power continued to grow.
It was only by Faurin’s wish that Elydir was captured and imprisoned in a powerfully warded tower. Elydir’s last act, before she was imprisoned, was to curse on those of Denau in revenge. She unleashed her power to rip a portal to the ice plane, bringing a raw and bitter life to those who fought against her.
Unable to leave her prison, she spent years dedicating herself to means of influencing the outside. To one day again be free and to take back her right to rule.
Goals 2
Elydir has the following goals in the campaign.
Escape the Tower 2
Trapped in the solace of her prison tower, Elydir has become master of illusion and divination. To escape, she needs the Dawnsword Amulet. Using her powers the elf-wizard has watched from afar. She has manipulated history through apparitions and dreams, causing turmoil and trouble, and attracted followers.
The wards protecting the amulet have frustrated Elydir’s plan to use her followers to recover it. She has discovered that the amulet can only be found by those who do not aim to free Elydir. This failure has lead to her plan to deceive adventurers into returning this amulet to her and has been doing so by bringing misfortune to Aymeluma.
Once she has escaped the tower, she will forget about the adventurers as they have finished their use, to focus on her other goals. At least, that is, until they next interfere with her plans.
Rule Denau 2
Punish the Aymelumans 2
Find the Shards of the Fulcrum 2
Role-playing Elydir 2
Elydir believes she has the right to rule and she has the will to dominate. She believes that she will create a better, fairer world. One without abuse ruled through might and power. If the characters ask why she should rule, she tells them it is because she was taken from her safe world into their treacherous one and no others in their world have the will to fix it.
There are very few things Elydir wouldn’t do to achieve domination but she will avoid hurting the innocent, especially children. In spite of this, it tales very little for the innocent to be judged as guilty and she is merciless to those who are guilty - as all Aymelumans are.
Before her imprisonment, Elydir was impulsive and fiery. Over the four centuries in the Lonely Tower, she has become calm and calculating but she seeks an unfeeling and cold vengeance. She cares little for the freedom and livelihoods of those that she would rule. While she has become detached in most ways, she fears being controlled, as she was by Lainot, or betrayed, as she was by Faurin.
Elydir is patient. Her plans take years to unfold, she and she is unlikely to be deterred by failure. Through her scheming, she will exploit others but will discard them when they are no longer useful. Using her powers of divination and persuasion, she will investigate those who oppose her ends and use their failings to her advantages.
Paranoia forces Elydir to rule from afar. She influences her own forces and other factions through carefully selected few intermediaries preferring deception and anonymity. Even with her intermediaries, Elydir is cautious and will use her powers of projection to conceal her true location.
Elydir’s interference 2
Elydir will meet the adventurers early in the campaign out of necessity. Unless they are a clear threat, she will forget about them. However, it’s unlikely to take long before she recognises their threat if they oppose her. When she is free, she will aim to be unknown to the world. She will avoid direct confrontation but the characters will face those who follow her or those who are manipulated by her.
Using her powers of divination, Elydir will spy on the characters and their allies. In this way, she finds the adventurers useful and will want to keep them alive unless they become too much of a threat. She will accept strategic losses and allow the characters to have short term success to gain the upper hand. Limited resources and grand goals stand in the way of Elydir focusing directly on the adventurers but she will use her resources to weaken.
Elydir relies on others and her magic items for her immense power. Alone and separated, she is still a force to be reckoned with - using manipulation and enchantment to control others.
Adventure hook 2
The characters start their adventure awaiting a meeting with Lady Alymir Glynlamin. The party will start in the elven village of Aymeluma.
You have been invited to meet Lady Alymir Glynlamin who is concerned about recent wolf attacks in her village of Aymeluma. You have each travelled there. It’s one hour before the meeting is planned.
Start the wolf attack event.
The Region of Denau
Chapter 2
Denau was once a land once protected by the harshest of weather and the people thrived on fertile volcanic lands before Elydir’s curse.
People 2
Icebringer’s Ictus 2
Tower road 2
To see how quickly the adventurers get through the city to the, the characters can take a DC 20 Survival (Wisdom) check. On a:
- success, the journey takes 24 hours, with 1 night’s rest. The first day gets them to the road. The second day gets them to the city in the afternoon.
- failure, the journey takes 48 hours, with 2 nights’ rest. The first day is spent being lost in the wilderness. The second day gets them to the road. The third day gets them to the city in the afternoon.
General environment: Moor–wilderness → Road in the moors → Road through hilly–forest → Road through hilly–forest broken up by pastures (mountains and city in distance)
The Denau Mountain path 2
Steep mountain path that winds up the wooded foothills of the mountains. As the path climbs the mountain, it will climb along the top of an icy ravine, with cliffs down to the right. This path climbs for about 10 miles. Along the top of this ravine, it’s extremely cold (p110 DMG).
About 7 miles up the mountain, there will be strong winds (p110 DMG) and is obscured by heavy snow (p110 DMG, heavy precipitation). Players will think they hear a howling on the wind. Around here, a DC 16 perception check will show that there are animal tracks around. A successful DC 18 Wisdom (Survival) check will identify these as three wolves and two winter wolves which have travelled up the mountain.
After another mile, the players will be set upon by two winter wolves (p340 MM) and three wolves (p341 MM). In the area there will be chunks of slippery ice (p110 DMG), tall cliffs and rocks to hide behind.
After another half mile, the ravine eventually disappears and the characters are now in a path between two mountains, still climbing.
At the top of path following up the ravine, the path splits: to the north, further up the mountain; and to the east, down the mountain. A mostly covered signpost shows that the [[mountain monastery]] is up the mountain, and Aymeluma is down the mountain.
Coming back down the mountain on east side, the players will follow a river that joins from the east of the mountain.
Major events
Chapter 3
Events in Denau after 2
While the players are in Mount Celestia, Elydir is still moving against them in their home plane. Consult the following list for the happenings on the numbered day:
- -
- -
- Orcs move to take Carnelu
- -
- Carnelu, a village east of the Denau mountains, is taken by the Orcs
- A band of rouges break into the City of Denaura and kidnap the elvish children
- Elydir finds the Wizard who knows of the location of Nar
- -
- Elydir sends an Orcish army to put Denaura under siege
- -
- -
- Denaura is under siege by the Orcish army
- -
- Lady Pertana is assassinated
- Denaura is taken and is ruled under marshal law
- Elydir makes Denaura her capital
Additionally, on the second day, the players will receive a taunting message on the sending stone: “You are fools to leave at such a time!”
Random encounters 2
Use the random mountain encounters for every quarter day of travel (apart from the first day). Use 1d6 to determine whether the characters find a location, landmark, or feature.
During night, use the long rest events table.
Rumours 2
- Attacks from unsavoury creatures in the area have decreased and there have been fewer sightings
- Neighbouring lord in Limecall has recently passed away
- Cave in at the old tomb
- Beast people have been sighted in the woods to the north west of Denaura
It’s been a week since you have freed the City of Denaura from Qa’lir’s control. Since then, you’ve been paid a 250gp each to help secure the city from the creatures remaining here and the castle. You’ve made good progress and are to meet with Lady Pertana, who is still ruling the city in the place of King Morcant. During this time you’ve seen a lot of things: constructs made by Qa’lir fight anything around them; stationed wights murder innocents; and lots of fleeing cultists
Right now, you’re in Lady Pertana’s study discussing the progress in protecting the city. Pertana is sitting at her desk. There are papers piled and an empty glass of wine. Her eyes are bloodshot and
“We’ve been able to bring in some more of our guards from the surrounding areas,” Pertana says. "We’ve seen an abatement in the reports of bandit and goblin attack which is a great relief.
"I’m very grateful for the work that you’ve been putting in over the past week. Without your help, I’m doubtful that the city will have survived.
“Since the attack, we’ve been able to gather from our prisoners that Qa’lir was planning something call-”
A piercing screech interrupts Pertana, “for what you have done - Meriele, Elmon, and Aseir - you will know only pain.”
You each hear a whisper of a discordant melody and are wracked with a terrible pain. The room spins and your vision blurs.
At this point, ask the characters to make a Wisdom Saving Throw (DC 19). On a failed save, the characters take 5d6 psychic damage. On a successful save, the characters take half.
The melody subsides. After reorientating yourselves, you realise that the sound seemed to come from Meriele.
Pertana is standing and looking shocked and concerned but looks unharmed. She is pointing at Meriele and says “What was that! It came from you!”
The Letter 2
Meet at the Watcher’s Tavern in Jairnt, North of Denaura, on the night of the next new moon. There’s a matter to discuss that affects many people’s lives. I can provide you with a significant reward if you agree to help. Please be discrete.
Bring Elmon and Meriele.
You’ve heard news and rumours or a recent deposition of King Morcant, the old leader of the City of Denaura.
The petitioner 2
After a few minutes in the tavern, a tall hooded figure wearing a worn traveller’s cloak approaches from one of the corners. The figure takes a chair from a neighbouring table, and places it at yours, immediately sitting. The figure, in a graceful voice, says, “Good evening, Prince Aseir, Elmon, and Meriele. I’m glad to see that you’ve answered my request to discuss a matter with you.”
From the voice, you can tell that this person is unmistakably a woman
The woman’s petition to the character’s:
The city’s previous leader, King Morcant, has been supplanted by Lord Telnetar. Telnetar was once the leader of one of the three great noble houses in Denaura. The two remaining major noble houses in Denaura have stayed quiet and kept to their own business.
It’s odd, because Telnetar, when he was a noble was good-hearted and sociable. Now, he rarely leaves the castle and gives tyrannical and harsh orders to quash any opposition to his rule. The people of the city are living and acting out of fear.
My request of you, adventurers, is that you find out what Telnetar is doing and put a stop to it. You must stick together and be discrete or I think it is likely that you will be doomed to fail.
The petitioner is Juvia, the daughter of King Morcant, well versed in the politics of the city, poised to be the next Lord of the city. She fled with her father during Telnetar’s violent coup, after they saw the power in their assailants.
She is a 5th-level School of Evocation Wizard. Her intelligence score is 17, intelligence modifier +3, spell save DC 14, spell attack modifier +6.
The sort of information this person knows:
- the locations of the nobles’ mansions.
- information about the current nobles and which ones are most likely to help the characters.
- the direction to the city.
- reluctant: her own identity, she fears that, if the characters find out who she is, her family may be persecuted. She will explain to the characters that she’s worried about the knowledge causing harm to others if pressed for an answer.
- reluctant: the location of her father, King Morcant, and the rest of his family.
- reluctant: how she knows the characters, she met them when they visited the city and was awed by Prince Aseir’s stories.
The characters can identifier her if they succeed on a DC 16 Investigation check, if they have previously met King Morcant in his castle for a banquet. If the characters verbally identify her in a way that’s heard, they will be assaulted on the way to Denaura by five bandits who demand more information from the characters.
She will give them 100gp each for the troubles so far.
Elydir and the OlinarElydir 2
Since her escape using her amulet, Elydir’s has been planning to release great evil on the world as revenge for her prolonged imprisonment. The characters will remember the symbol on her amulet as a rising sun behind a dagger pointing down (this was not revealed to the players in Unbound but the characters will recognise it).

Elydir works in total secrecy, concealing her location with magic. She commands two loyal spellcasters Qa’lir and Qa’por, known to her as the OlinarElydir. Qa’lir and Qa’por are twins. They are know to common folk as “The Vanquished Fist”.
OlinarElydir 2
The OlinarElydir have been tasked with bringing Denau under her control. Elydir communicates with the OlinarElydir using sending stones, each carved with Elydir’s symbol and their own.
The City of Denaura 2
The prosperity of Denaura has now passed. The influence of Qa’lir has spread corruption in almost all parts of the city.
The Deposition of King Morcant 2
Qa’lir arrived in Denaura and quickly garnered respect as a rich merchant with the nobles. She quickly became close to Telnetar, eventually casting a spell to force Telnetar to do her bidding and threatening Telnetar’s family.
Qa’lir spent the next few weeks building a new guard force for Telnetar. Buying some of them, threatening some of them, and replacing some by apprentice spell casters. She personally replaced the old guard captain
King Morcant had regular meetings with Telnetar, and Qa’lir used this to stage the coup. Telnetar, attending this meeting bringing his guards along, citing a recent attempt against his life, and was allowed to keep the guards with him.
When the Telnetar and the guards arrived for the meeting in the castle’s parlour, they immediately fought King Morcant’s guards, attempting to kill the Lord. Qa’lir and the replaced guards used dark magic during the fight. Telnetar, realising a flaw in the magic that was binding him to Qa’lir’s magic, told King Morcant to flee during the fight. King Morcant, realising the threat, fled with his family.
The Kidnapping of Telnetar’s Family 2
After Telnetar’s disobedience to Qa’lir, Qa’lir ordered Telnetar’s family to be kidnapped to ensure Telnetar’s good behaviour.
Qa’lir in Denaura 2
Qa’lir’s servants are wights.
Qa’lir has spies throughout all parts of the city, from beggars to servants in the remaining noble’s houses. It only takes hours for displays of rebellion to reach the ears of Qa’lir. These spies have been bribed or threatened by Qa’lir’s servants.
Guards 2
One of Qa’lir’s first director orders through Telnetar as a puppet was to replace the head of the guard with one of her wight servants, Kexor. One of Kexor’s first orders was to kidnap Telnetar’s family.
In general, the guards now live in fear of Lord Telnetar and Kexor where before they were happy to serve. Severe disobedience usually leads to corporal or capital punishment. The guards are rarely used by the city government to prevent crime but instead are used to prevent the uprising of the people.
Guards are rarely punished for villainy and some (roughly 3/10) are revelling in it.
A rare few very good natured guards (roughly 1/10) will be willing to help the characters, especially if they see something that makes them realise the corruption. These guards will usually do it privately fearing the other guards. Most will be caught at some point.
The remaining guards will follow most commands from their superiors out of fear.
Civilians 2
Crime is now rife in the city, though very little of it is organised. Qa’lir has killed or threatened most of the gangs within the city.
Between harassment from guards and the rising crime in the city, most of the civilians are downtrodden. A lot of civilians believe that Telnetar was just waiting to seize the opportunity to take the city.
Aymeluma
Chapter 4
Nestled within a valley, the famed hot springs of Aymeluman give life a chance to flourish, or at least to give respite from the harsh mountainous lands of Denau. In the ancient elvish village of Aymeluma, people live simple lives. Good soils and warm air gift the elves with prosperous farming and many Aymelumans sing to Chauntea for this blessing.
Over the recent months, life hasn’t been as easy as this for the Aymelumans. There have been wolf attacks from the Forest of Beasts to the North East and the springs have been running cold. Lady Alymir Glynlamin, like her ancestors before her, leads Aymeluma, but the village doesn’t have the power to defend itself. She hopes her call for help to neighbouring villages and other lands will bring safety back to her village.
Only the Council of Elders know the terrible secret of Elydir’s heritage, that she was one of them and they will take this secret to the grave. The oldest of the elves swore to never let this happen again. When each elf reaches the age of 13, they make a vow never to use magic. Born after the reign of Elydir, Glynlamin is unaware of her relation to the village.
Aymeluman lore 2
In addition to the information known to all Denians, Aymelumans know the following lore:
- The villagers are ashamed of their natural magical powers. When they reach the age of 13, each of them makes a vow never to use them.
- Attacks are usually rare from the Forest of Beasts but recently there’s been wolf attacks. It’s dangerous to go hunting in the Forest of Beasts, especially at night, and it is difficult to track things in there. The villagers will avoid doing so.
- Lady Glynlamin has been missing during the wolf attacks and, after the attacks she appears to be ill.
- The springs are running cold. The village’s prayers to Chauntea have failed.
- Some Aymelumans believe that the village has been cursed.
- Relations with the followers of Silvanus, at Silvat, are good - the Silvatans occasionally trade with them and there’s been no history of conflict. They live to north west of Aymeluma a path.
Areas of the village 2

Village square 2
When the characters first enter the village square, read the following description:
Marble buildings surround the village square. Two grand buildings, one to the east and the west stand taller than the others.
In the centre of the village square is a statue of woman sewing seeds. In front of it, five elves sing in beautiful harmony, offering fresh fruit and dried to the statue.
Through the square, you can hear the river Ayme rush under a small marble bridge, adding to the harmony of the elves.
Market 2
The market runs on every seventh day of each tenday. Available at the market are: a baker, fresh goods, dried goods, a fletcher, a clothier, a blacksmith, and a carpenter. The fresh goods are limited due to the springs running cold. The craftspeople will have a small number of common goods and will accept commissions for twice the price.
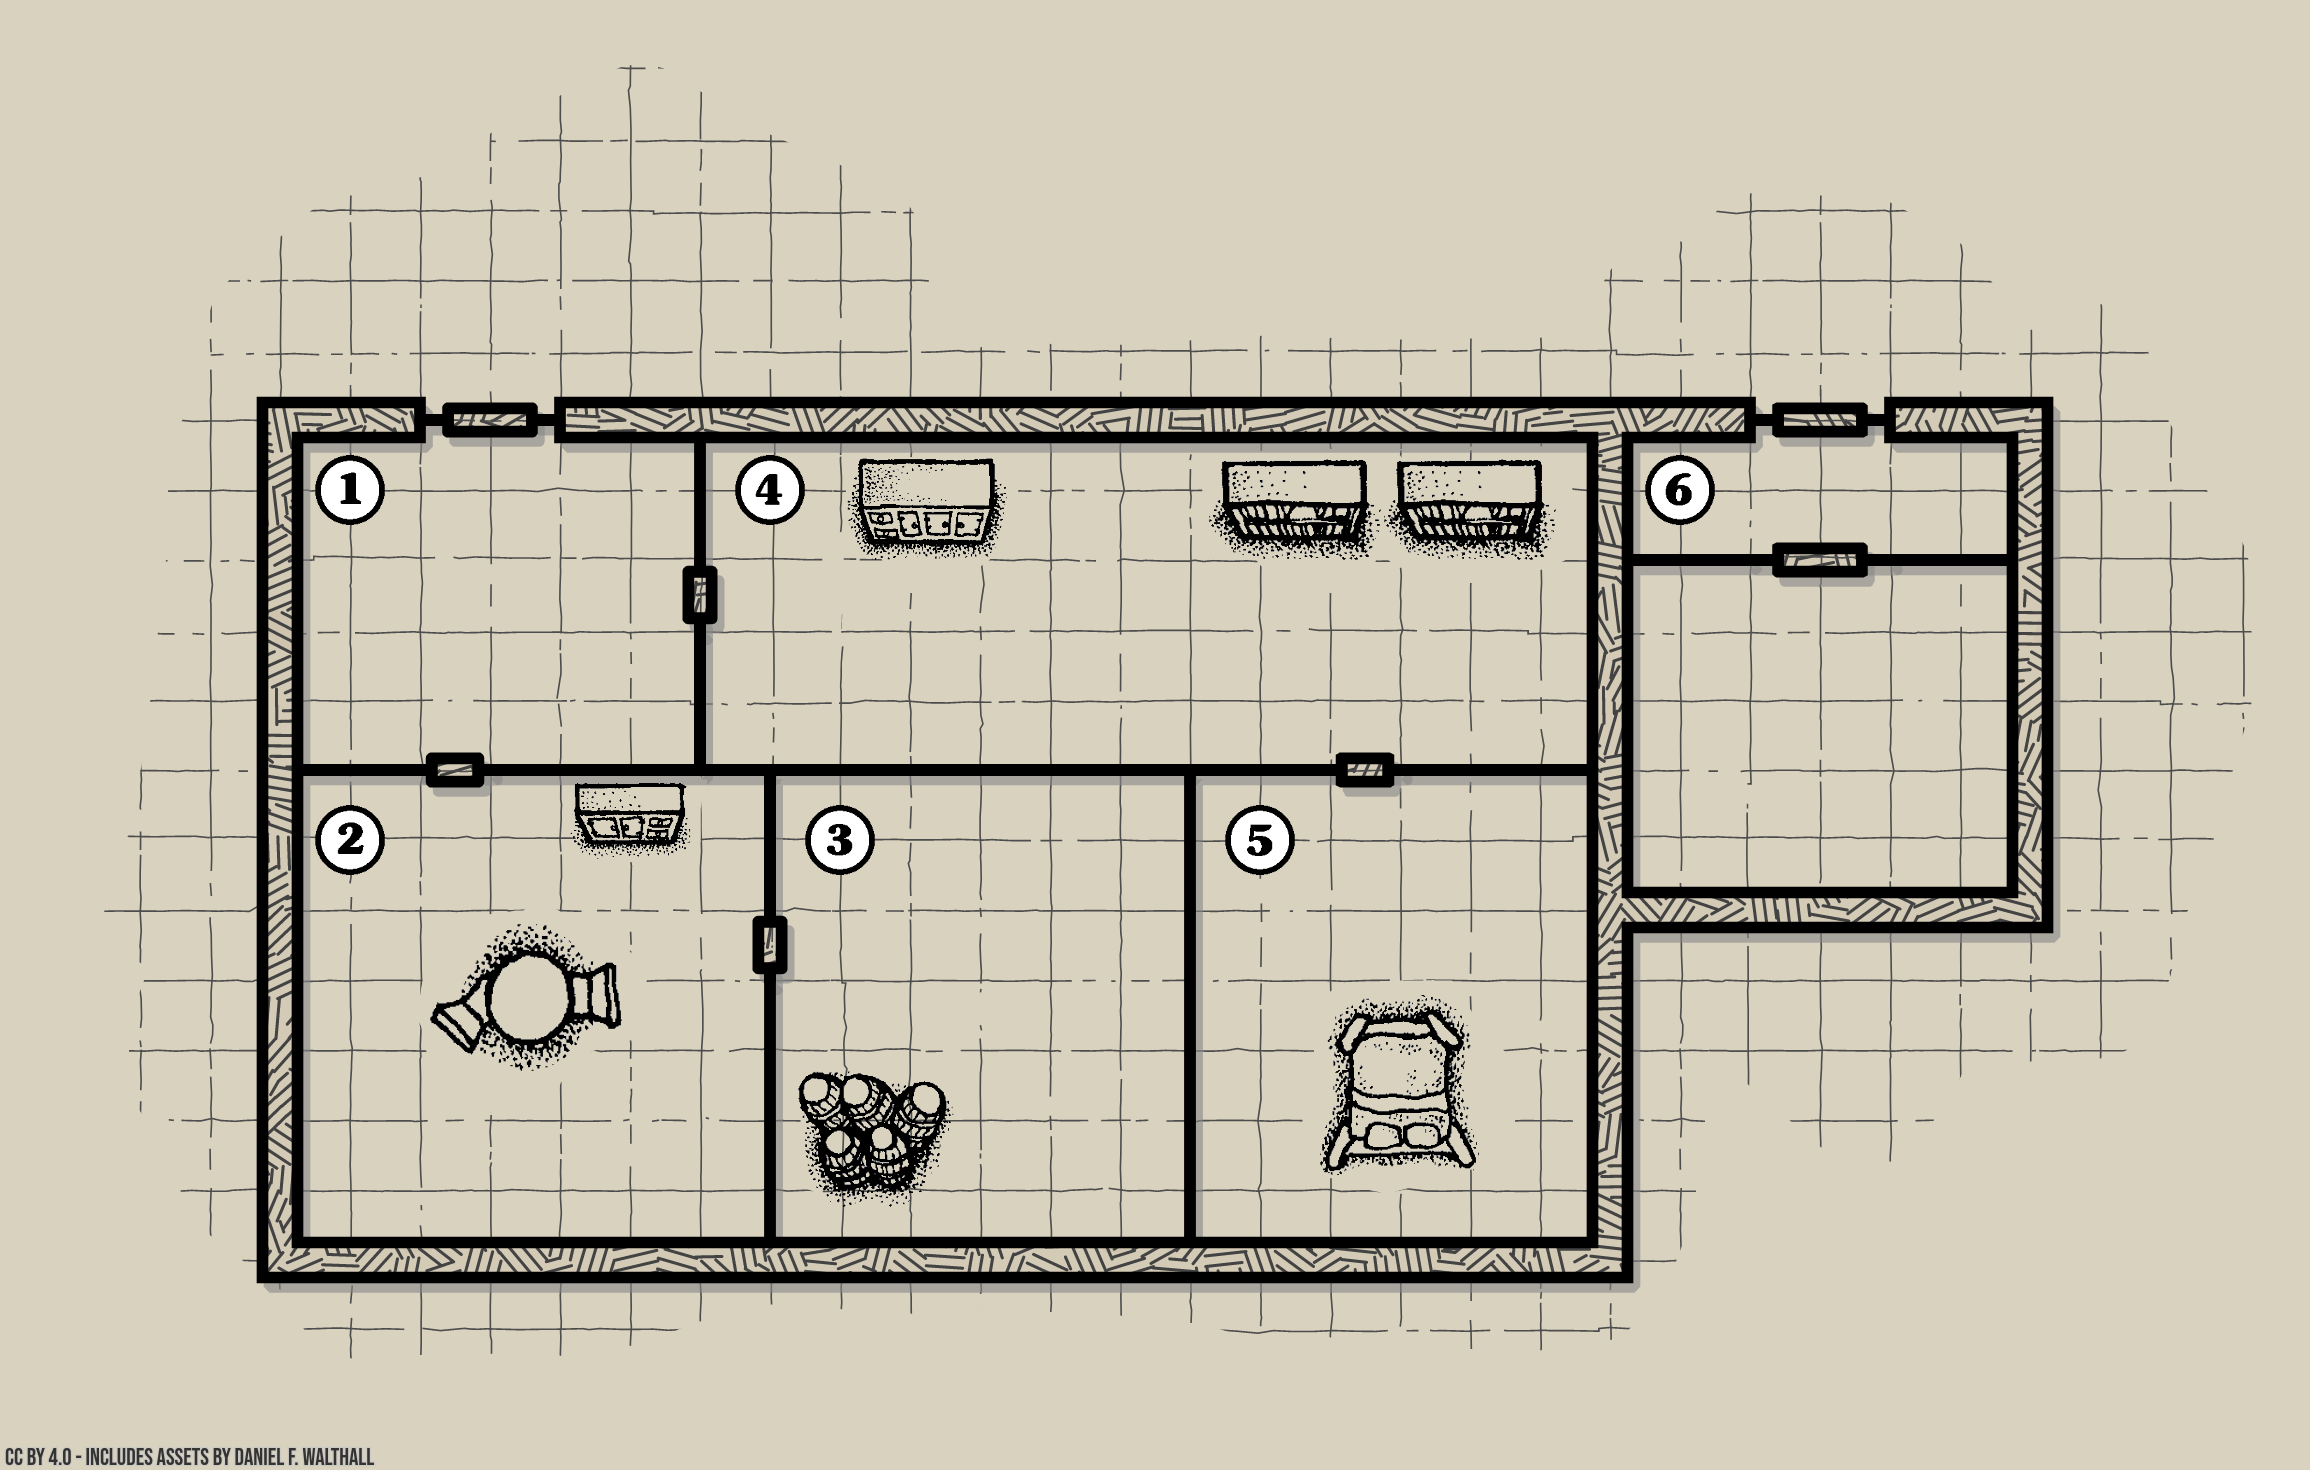
Glynlamin residence 2
When the characters first arrive at the building, read the following description:
This building, to the east of the square, is clean polished marble which looks more grown than built. The walls gently curve and there’s barely a crack between the stones. A small garden has overgrown.
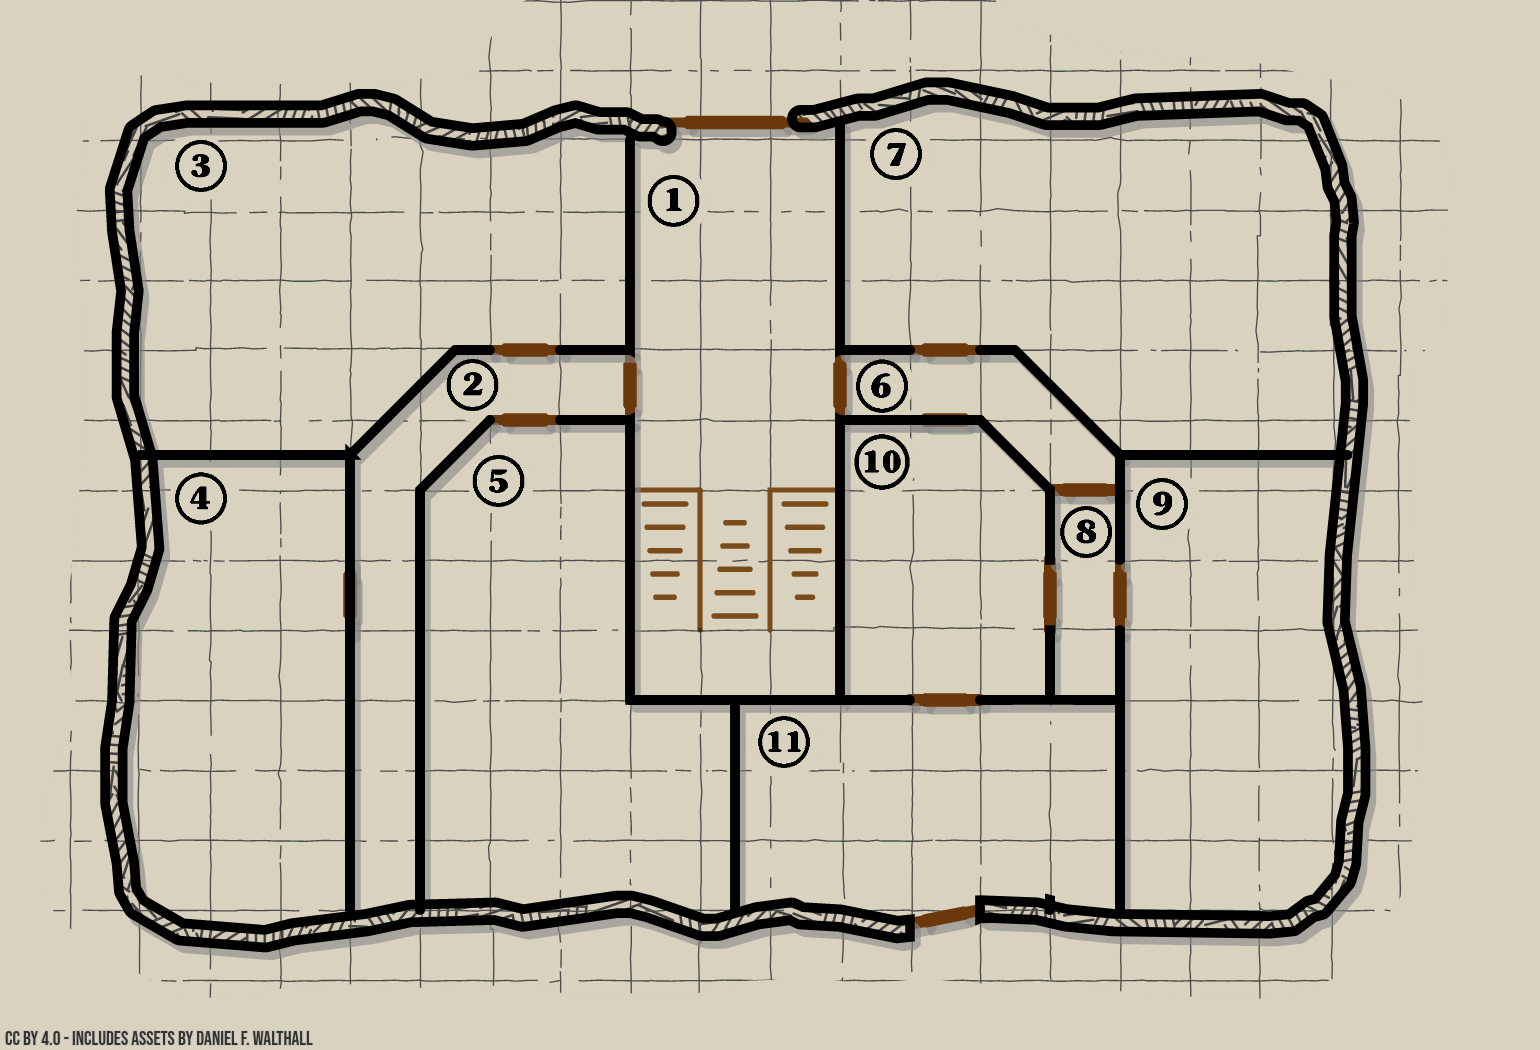
1. Entrance hall 2
The grand entrance hall’s stairs are fashioned after oak trees. The stairs to climb up opposite to the entrance, to the east, and split off back to a balcony above. Before the stairs split, a grand tapestry showing a woman sowing seeds, trees around them, and the sun rising behind. Scattered on the floor are leaves and other debris.
The stairs lead to area 12.
If a character succeeds on a DC 18 Wisdom (Perception) check, they will notice a darker patch on the tapestry. On the back of the main tapestry, there is a passage, scrawled in common. Nobody in the village knows of the origin and Lady Glynlamin is unaware it is there.
The liar tricks to be unbound.
The lover fights again and fails.
The raider strikes at all his kind,
The captor flees to mountain trails.
The caster pursues an end combined,
The fighter tells his ancient tales.
2. South corridor 2
Candles, half of which are unlit, dingily light the walls. A dusty but otherwise well maintained patterned rug follows the corridor path, including the curve in the middle from east to south.
3. Library 2
The library door is locked when not in use by Lady Aymeluma, which it frequently is. On a DC 15 Strength (Athletics) check, a character can break the door down. On a DC 12 Dexterity check, a character can unlock the door with thieves tools.
Books and scrolls line the walls and the shelves are untidy. A window provides light to the desk where books are strewn. A few unfinished letters are scattered across the desk.
The library contains books about the history of Aymeluma and its relation to other areas. Content about Elydir was destroyed by the Council of Elders out of shame. The letters are to other villages with advice on matters, none of which seems relevant to the attack in the night.
If a character succeeds on a DC 13 Intelligence (Investigation) check, and spend an hour researching, they will find out that the relations with the followers of Silvanus in the Forest of Beasts have always been positive and respectful. They will also find that, while there are books about the gods in here, the book about Silvanus is missing. If a character succeeds on a DC 17 Intelligence (Investigation) check, they will realise that there are references to books and history that is missing from 500 years ago.
4. Parlour 2
The warm autumn colours and fabric tapestries that adorn the walls don’t stop the cold from seeping in. At the far end, a grand fireplace is empty, apart from charred remains and ash. Above, a large portrait, with an old elf man, wearing robes of Silvanus and a gold leaf, he wears an oak leaf signet ring on his hand. On the mantelpiece is an empty decorative bell jar.
The gold leaf in the portrait looks similar to the golden oak amulet. A character who succeeds on a DC 13 Intelligence (Investigation) check will notice that number of engraved veins is the same on both.
5. Drawing room 2
The dark room is filled with comfortable padded chairs and benches, and dusty tables and cabinets. The curtains are unopened.
There is nothing of interest in this room.
6. North corridor 2
The short corridor, with a patterned rug following the curve from east to north.
7. Dining room 2
A large table fills this dining room and it’s covered in dirty plates on a stained tablecloth.
There is nothing of interest in this room.
8. Servant corridor 2
This corridor is short with no furnishings and is lit by a single candle.
9. Servant room 2
On one side of this room is a small clean and tidy bedroom. On the other side, a messy storage area with tables and chairs.
Often, Aien can be found hungover in this room.
10. Kitchen 2
The kitchen has plates and bowls piled in the sink and flour and dust over the surfaces.
If this is in the day after the attack in the night, then read the following description:
On the floor is a smashed glass and a puddle of wine.
The glass was smashed by Maiele when she was rushing to leave, after Aien arrived back early.
If a character succeeds on an DC 12 Intelligence (Investigation) check, they will notice that there is a streak of wine that points towards the pantry.
11. Pantry 2
The back door is usually locked. If a character succeeds on a DC 17 Strength check, they can break down the door. If a character succeeds on a DC 13 Dexterity check, they can unlock the door with thieves tools.
This pantry is lined with barrels and jars, smelling fresh, though it is a little dusty.
If a character succeeds on a DC 15 Intelligence (Investigation) check, they will notice that there is a patch of dried red wine on the door frame.
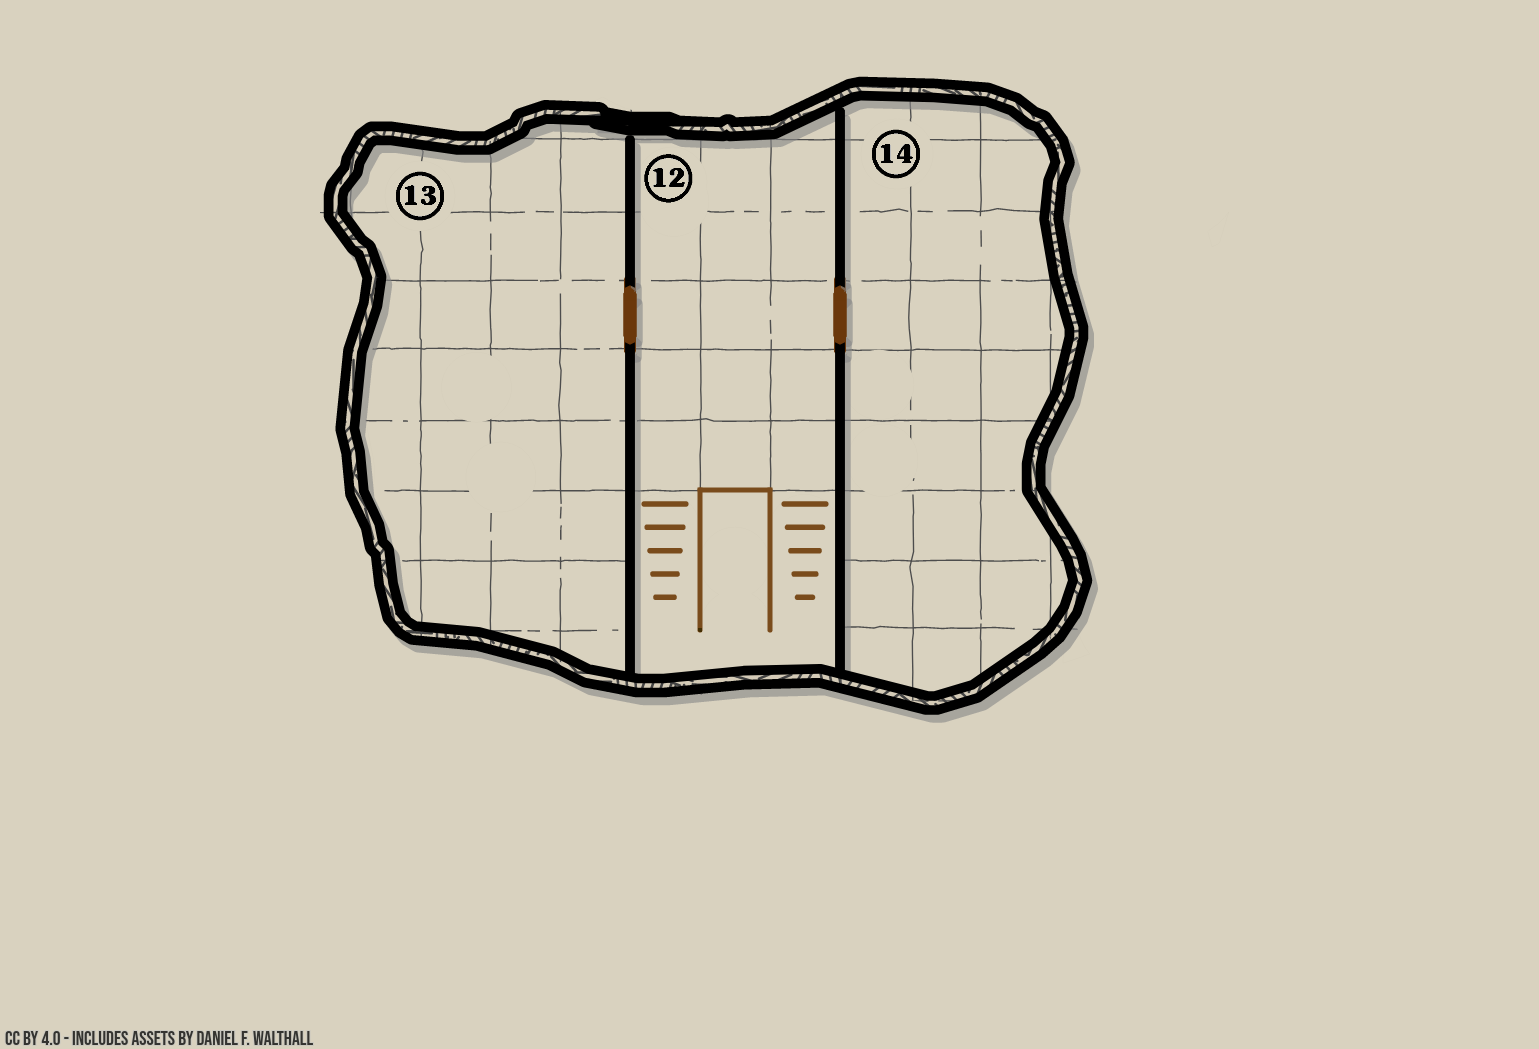
12. Balcony 2
The balcony looks down onto the stairs inside, and a window looks out to the village square. There’s a door to the north and to the south.
On the balcony, the door to the south leads to Glynlamin’s bedroom. The door to the north leads to a guest bedroom.
13. Lady Glynlamin’s room 2
A large bedroom with a grand bed and meditation area. The room is clean.
In the days after the attack on the night, Lady Glynlamin will rest in here. She will be wearing her oak signet ring. This ring will not match the pattern of the signet on the wax seal on the fake letter.
14. Guest bedroom 2
An empty bedroom, with the bed unmade and curtains closed.
There is nothing of interest in this room.
Roleplaying Lady Alymir Glynlamin 2
The leader of the Aymeluma, Lady Alymir Glynlamin (NG elf noble woman), does not place herself above the rest of the elves in the village. She has lead the village for 100 years and over that time she has come to believe in their tradition of support through community.
However, Lady Glynlamin is at odds with the Council of Elders and doesn’t trust them as much as she wants to. She knows they hide a secret about the past of the village but has failed to get any useful information about them. She will only admit this to those that she trusts and she will swear them to secrecy.
From the war against Elydir that Lady Glynlamin lived through childhood (though she didn’t know the cause), she has a fear of violent conflict and will avoid it at all cost. Because of this, the village barely has a militia. During conflict, she will hide. She is ashamed of this and wishes she could face her fears.
Recently, Lady Glynlamin has had the hard task of leading Aymeluma through disaster after disaster. While the villagers has worked hard to support one, she has realised that. She will welcome whatever support from outside the village.
If questioned about the gold oak leaf amulet, she will say it was stolen from her years ago, along with a book about Silvanus, but they never found out who it was. She can confirm that the gold oak leaf amulet is hers.
She is reluctant to let people into her study as there is sensitive information about the Aymelumans in there.
Roleplaying Aien, the house-servant 2
Aien (CN elf commoner man) is lazy, sarcastic, and often insulting. Since the disasters in the village, he has been shirking his evening job of watching the house to drink at the Easing Water. He will blatantly lie about this, even if caught. He is usually hungover.
Aien has some information that might be useful to the party, though he will want a price (10gp) to be paid for it:
- He has been keeping Lady Glynlamin’s cowardice a secret, hoping to make the most out of it.
- There is a tension between Lady Glynlamin and the Council. Aien has heard an argument about the Council hiding something from Glynlamin.
- The main set of keys to the house are missing, though he won’t give that he was drunk when they went missing.
If asked about the golden amulet, he will talk about how it was stolen a few years ago, along with a book about Silvanus from the library.
Council of Elders 2
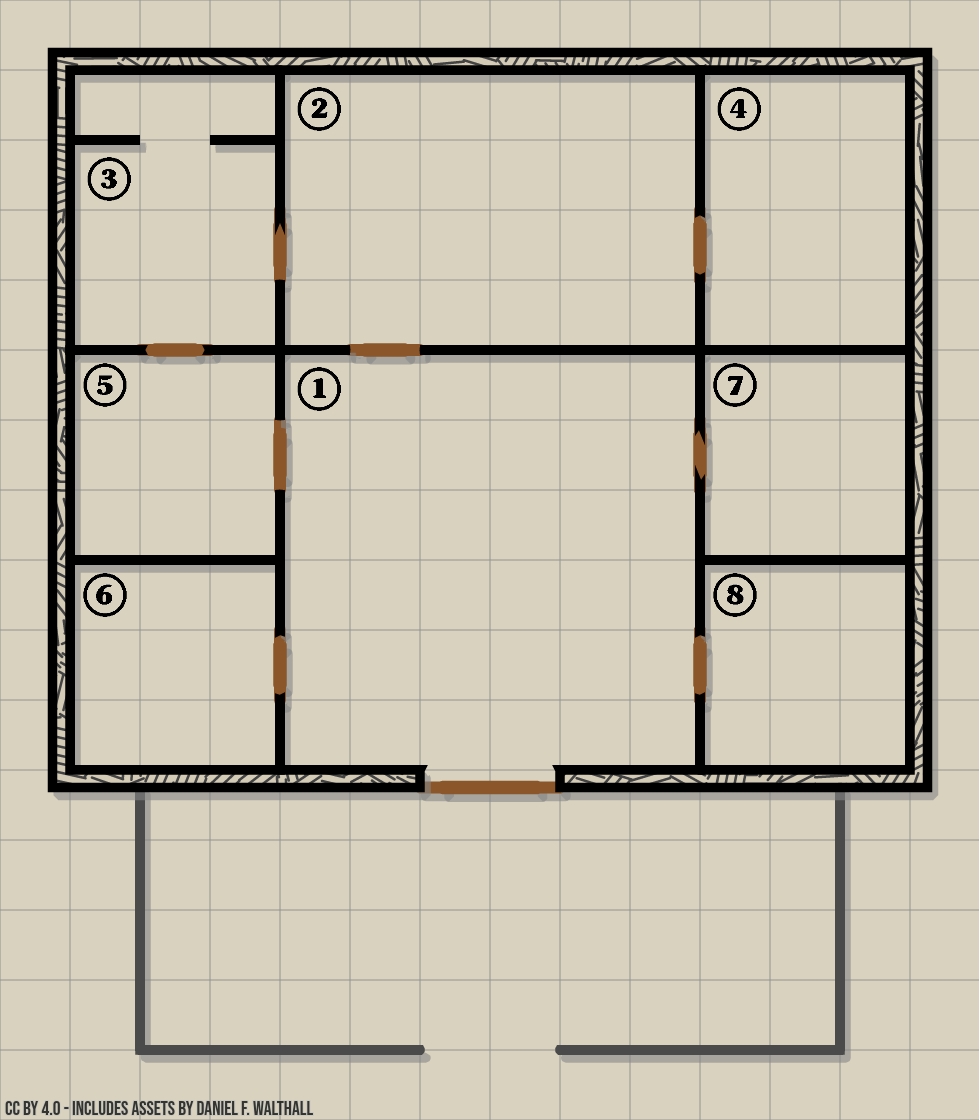
An ornate stone building with large wooden doors. Two decorative pillars show rising suns. Outside the building are three large well maintained bushes, growth creeping out under them.
There are four vine blights, hiding under the large well maintained bushes. These are controlled by Maiele. She will only use them if she feels threatened by the characters.
1. Public chambers 2
There’s a small stage at the far end of the room with a reading plinth.
The doors to the other rooms are labelled with the inhabitants or purpose in elvish. Each of the doors to the personal rooms, apart from the private chambers are locked. A character who succeeds on a DC 16 Dexterity check will be able to unlock the doors.
2. Private chambers 2
There’s a large table in the centre of the room with three chairs around it. One cabinet is stocked with papers, the other is stocked with tableware. Opposite the main entrance is a well stocked fire, keeping the room warm.
The cabinet contains papers relating to the laws of the village.
The council will usually meet in here between noon and dusk, for business and for dinner.
3. Kitchen and pantry 2
The kitchen smells of bread and fruit. The pantry is well stocked.
There is nothing of interest in this room.
4. Records room 2
Shelving of books and scrolls fill this room.
It’s easy to find the treaties with neighbouring areas, including the pact with the Silvatans, not to expand into each others land. It’s easy to see that this has been followed.
The text is to do with the history of the village and its inhabitants. If characters investigate for a day and succeed on a DC 18 Intelligence (Investigation) check, they will find that there is a lack of history from around 500 years ago in here through missing references.
5. Servant Orihil’s room 2
While the door to this room from the public chambers is locked, the door to the kitchen is unlocked.
This tidy room is for both work and rest. There’s a narrow bed on one side. A window provides a little light to the room. A small desk has a set of keys on it. A large wash tub filled with pinkish water has a purple cloak draped over the side.
The keys on the desk will open the doors to the council members rooms.
The purple cloak is Maiele’s with a wine stain - the stain is barely out of it.
6. Elder Ilphas’s room 2
Bookcases surround the walls of this room. A bed is pushed up against the bookcases on one wall. A desk up against the wall opposite the door.
The table has draft law about the import on magical items, like potions of healing. The library is mostly books about law from places near and far.
7. Elder Maiele’s room 2
This room is very tidy and empty. On the left hand side is a bed and meditation area. In the centre is an empty desk, apart from a single key. On the other side is a wardrobe.
If the characters open the wardrobe, read the following description:
The wardrobe is partly full, with many items. There is a chest at the bottom.
The chest in the wardrobe is locked. The chest is trapped and if it’s opened without pressing the buttons on either side, it will trigger a cloud of Malice poison gas within 10 ft of the chest. A character who succeeds on a DC 12 check will notice the buttons on the side. If a character succeeds on a DC 17 Dexterity check, they can unlock the chest with thieves tools. If a characters succeeds on a DC 14 Strength check, they can break the chest open - this will trigger the gas.
Inside the box is the following:
- A signet ring with oak leaf. This is a forgery created by Maiele to create the fake letter from Lady Aymeluma.
- A book about Silvanus (stolen from Lady Glynlamin’s library).
8. Elder Alasse’s room 2
This bedroom room is filled of small trinkets and items. A writing desk is covered with papers and a small library overflows with books.
This is Alasse’s room.
If searched, the characters will find there are a few books on the ethics of magic. Her journal will be filled with thoughts about whether or not the Swornight is effective.
Council lore 2
In addition to the information known to the Aymelumans, the council members know the following lore:
- Lady Glynlamin suffered violent conflict in her childhood and is unable to defend the village from conflict.
- They think lady Glynlamin does not trust them and is up to something.
- The world was warm before Elydir.
- Their families final act of magic was to create the hot springs that keep their areas safe.
- Lady Glynlamin’s father followed Silvanus.
Roleplaying the Council of Elders 2
The Council of Elders each lived through Elydir’s reign and destruction of their people. They have agreed to never discuss Elydir with the village - that the secret will die with them.
Elder Ilphas (LN elf noble man) believes in the law. He is a very serious man, with little humour. Through fear of magic, following Elydir’s wrath, he created and officiates the Swornight ceremony. He is unforgiving for any who break those rules, no matter the circumstances, though he will not use force or violence but will instead seek to isolate the rule breaker. Many of the village follow his thoughts on this. Ilphas will be critical of any solution the characters bring to them about the attack in the night.
Elder Maiele (NE elf cult fanatic woman) is Elydir’s older sister and secretly worked with her when she was in power, out of anger for how the village sold her. She knows that Elydir is still alive. She works in two ways against the village: use the tradition of no magic to weaken them, and to frame Lady Glynlamin for the disasters happening to the village. She believes that this revenge will bring peace. She will act carefully in secrecy but if she her plots are discovered, she will aim to cause as much destruction as possible.
Elder Alasse (NG elf noble woman) believes the village should take a softer approach the restriction of magic through education to prevent it from being used again. However, she does not have the will to go against Ilphas and Maiele, though she is more likely to side with Ilphas. She hopes to outlive Ilphas and Maiele and bring around a positive change for the village.
Servant Orihil (LE elf spy man) works closely with Maiele, enjoying her power and the benefits that come with it. She has lead him to believe that the magic restrictions are preventing the village from reaching its best outcomes. He spies on the other Elders and other villagers for Maiele. He will generally decline to speak to anybody but the Elders, as his job keeps him so busy - though he is efficient at it.
Shafina residence 2
TO DO
Roleplaying the Shafina family 2
TO DO
Fires of the Spring - Smithy 2
A warm light flickers from the door of this building and smoke billows from the chimney. A sign hangs with elvish text on it and a steaming river.
The elvish text says Fires of the Spring.
The smithy fire burns hot in the centre of the room. Gold, silver and iron bars are stacked on one side. Agricultural and builders equipment is stacked on the other. A single sword is hung up on the opposite wall to the entrance.
The blacksmith, Ena Magphine the Strong (CG elf commoner woman), is a burly woman who is well mannered and smart. While she works in a smithy, she believes you need to be in touch with nature and take good care of yourself. She believes you should just try to get along rather than control one another.
Ena has traded with the Silvatans before, with gold, and they have always been friendly. She knows that their past relations have been good, with agreements to keep to their own lands. She saw a figure cloaked in purple enter the Elders very late last night, while she was locking up. She will be will be reluctant to speak badly about the Elders and will appear nervous when questioned.
The Easing Water - Inn 2
A sign hangs from the inn, with a painting of a steaming pool with a bare chested man relaxing in it, text in elvish below it. The outside is decorated with swirling patterns like steam and flowing water.
The text in elvish reads The Easing Water.
Inside the inn 2
The inn is small and decorated blue and white. A large fireplace keeps the room warm. A small bar with bottles of wine and wine glasses fill the shelves on the back wall, apart from a hole for a closed hatch. A door to right of the bar has a sign in elvish above it.
The text in elvish reads Hot springs.
The innkeeper, Uldreiyn Caigeiros (TN elf innkeeper man) is very perceptive. He believes it is important to do what feels good and likes to chat about rumours and things he’s seen. He will always recommend using the hot springs, calling it “the magic of the elves”.
If the characters stay to have a drink, he will be willing to talk to them about the goings on of the town. In addition to the general lore, he also knows that Aien is often drinking at the pub in the evenings when he’s meant to be working and that he was even that drunk once that Servant Orihil had to take him home - and when the Orihil stole the keys for Maiele keys were stolen.
Aien was at the inn last night during the attack in the night but Uldreiyn asked him to leave early after he drank too quickly.
The bar sells only the grape wine grown locally for 1sp per glass.
Hot springs 2
Walls surround four steaming pools of water. Seats have been carved into the natural stone of the springs. The hatch to the bar is on the wall for the building Small tables for drinks surround the pool.
A Water Weird will attack the characters here during the attack in the night.
Grainsheaf Farm 2
A marble single story farmhouse faces out to the north to large wheat fields. Wind flows across the tall wheat, which looks limp and pale.
Beyond, a dark pine forest looms.
The farm owned by Kendel and Toross Umelee, two married male elves. The farm has been suffering from the failing springs and their crops are weakened because of it.
Roleplaying the Umelee family 2
Kendel Umelee. Broader than most other elves, Kendel (NG male elf commoner) is fiercely protective of Toross and the farm. He has heard of the recent wolf attacks to the other farms and has carried. He carries a scythe to defend his family and a horn to warn the rest of the village. While he is an expert farmer, Kendel has no experience fighting with the scythe.
He believes that the wolves aren’t after food but are controlled by something evil as they have only been attacking people.
Toross Umelee. Sceptical of the Kendel’s ideas about the wolves, Toross (N male elf commoner) is worried about Kendel’s plans to defend the farm.
1. Boot room 2
The smell of mud and dirt fills the air. Dirty boots and smaller farming equipment is stored on the right. There is one wooden door opposite you and one to the left.
2. Dining room 2
The furniture is delicately but simply crafted. A table and chairs in the centre of the room, and a cabinet against the wall. There is a door to the left.
3. Kitchen and store 2
The door to this room is locked.
4. Parlour 2
Simple, well loved furniture. Painting of Kendel and Toross.
5. Bedroom 2
Single double bed.
6. Barn 2
Horse and equipment in barn.
Forest clearing 2
To the south of the village is a large clearing in the forest. This is often used for village festivals.
Silvanus Shrine 2
The shrine is to the north west of the village, just off the path to Silvat.
In a small clearing just beyond a small, a carved wooden statue of a semi-draped man holds out an oak branch. Its legs appear to grow out from the stone plinth. The stone plinth has an oak leaf carved into it. The area is kept clean, though a few dead shrubs rustle in the wind around it.
Below the statue is a hidden box. Inside the box is a sealed with an oak leaf signet, which has been planted by Elder Maiele. The letter says the following:
B. Attack the remaining farm tomorrow. Kill the inhabitants. AG
If a character succeeds on a DC 12 Wisdom (Perception) check, they will notice a stone gap built into the base of the statue. If the golden oak amulet is placed into the stone plinth, it will unlock. If a character succeeds on a DC 17 Strength check to move the base, they will break the stone apart the stone base. If they succeed on a DC 13 Strength check, they can break the legs of the statue and get into the stone plinth from above.
If the handwriting or seal is compared to a real Lady Glynlamin’s character succeeds on an DC 12 Intelligence (Investigation check), they will notice inconsistencies.
If a character succeeds on a DC 18 Intelligence (Investigation) check, they will find tracks leading to the Council of Elders.
When the characters try to leave the shrine, 12 Twig Blights, created by Elder Maiele will attack the characters.
Special events 2
Wolf attack 2
This event happens when the characters first arrive at the village. To the north of Grainsheaf farm, wolves begin to attack. Immediately, the Kendel Umelee of the farm will sound a horn and then Toross will run to the village.
You hear a long horn blast to the north. A few seconds later you hear a man shouting “the wolves are attacking our farm, they’re getting my husband.”
Four wolves are attacking the elves at the farm, aiming to attack the people and not any livestock or other animals. These wolves can’t be frightened off but will flee when two of the wolves have been killed.
Add the following description to the Grainsheaf farm:
Almost hidden by the wheat, you see an elf (Kendel) swinging a scythe at two wolves who are approaching him. Another wolf jumps out from the wheat at him.
Once the wolves have been killed or driven off, the characters will be urged to seek Lady Glynlamin by most bystanders. Lady Glynlamin will be shaken by the attack. She will offer 50gp to the party for finding the source of the attacks and another 50gp for stopping them.
Attack in the night 2
This event happens when the characters return from fighting the wolves.
Lady Glynlamin has been attacked by Elder Maiele during the night using _Vicious Mockery_to mock her cowardice. Elder Maiele entered through the door left unlocked as Aien was drinking at the Easing Water. Before the attack, she placed a golden leaf in her office. Elder Maiele has suggested, to the council, that Lady Glynlamin has fabricated this event to deflect from her recent failings - which the council agree could be a possibility.
While there are no physical wounds, Lady Glynlamin will be feverish and inconsolable about her cowardice and will be reluctant to talk about what happened to her. If a character succeeds on a DC 15 Charisma (Persuasion) check to get information, she will tell them the following:
- She was attacked during the night.
- The attacker shouldn’t have been able to get in past Aien.
- The attacker spoke unfamiliar words and then cursed her for her cowardice.
- The attacker fled after hearing a noise downstairs, but said “You’re lucky to get another night, coward.”
- She couldn’t see the attacker because of a cloak and the dark - but it was a woman’s voice.
Read the following description when the characters arrive in the village:
The village looks empty, you don’t see anybody around. You can hear noise coming from the village square.
Read the following description if the characters reach the square:
The noise comes from the tall building to the west.
Read the following descriptions if the characters enter the Council of Elders, if it is the characters first time visiting the Council of Elders, read the description of the building:
Inside the main room, a restless crowd is gathered. Three of the ancient elves stand in front of the crowd, two women and a man. Many of those in the crowd turn to look at you.
After a few minutes, as the noise quietens, the man says “Lady Glynlamin was attacked during the night. She survived and is recovering. We will find investigate what happened.”
The crowd will then disperse.
The council will greet the party. They will ask what they found out about in the forest so far - they will give the reward promised by Lady Glynlamin.
They will explain that Lady Glynlamin says she was attacked in her house at night, though she shows no wounds. The council will ask them to investigate what happened. If the characters talk of the involvement of the wolf attacks with Sylvanus, the council will say that Lady Glynlamin’s father was a follower. The council will suggest that they are concerned that the attack could be fabricated to distract from her failings. They will ask them to bring the answer to them.
During the characters investigation, Elder Maiele will send 3 Vine blights to attack the characters. She will attempt to use this to banish the characters from the village due to their trouble making.
Invasion 2
As part of getting vengeance on the…
Approaching the village 2
When the players approach the village after the invasion, read the following description.
There’s a stench on the wind. An oppressive, malignant smell. Blood. Smoke.
Through the trees, you can see glimpses of the ornate stone buildings with walls charred.
All of the buildings are either fully destroyed or
Village square 2
When the characters arrive in the village square:
The stench of destruction is overpowering here.
The small river flows serenely, despite the terrible scenes in front of you. On the north side of the river, you can see a small town square, dark click red patches cover the paved square.
Most of the other buildings have collapsed, their contents smouldering and their white husks blackened. Cracking stains of carmine are scattered along their walls. There are broken carved pillars and arches - hints of the elaborate patterns and ornate structures.
On the west side of the town square, a slightly larger building is still mostly standing. Its walls are blackened, like most of the others, and you can see that the ceiling has collapsed in a few places.
If the characters have got to this village within a day of the attack Denaura, if they make a successful DC20 Wisdom (Perception) check to hear if anything is in the area, they will hear what sounds like distant shouting to the south.
Investigation checks DC15 will show signs of dragged bodies to carts and tracks to the south.
Hiding girl 2
If the players have made it to the village within three days of the attack, they will find a young elven girl, Shyrrik Shafina trapped in the Glynlamin residence. She will shout for the players if she sees or hears them.
She will want her mother, Pharom Shafina, who she saw being dragged away by orcs. She will remember seeing a cloaked figure with the orcs.
If they fail to make it within three days, they will find Shyrrik Shafina’s body instead.
This is the larger building in the town, the walls are blackened like most of the others and some of the ceiling has collapsed on parts but the
The doors outside the building show the symbol of Elydir, on them.
Piled in the centre of the room is smouldering furniture and books.
The prophecy 2
Within the Glynlamin residence, the prophecy.
The liar tricks them to unbind.
Her lover fights again and fails.
The raider strikes at all their kind.
Her captor flees to mountain trails.
The caster’s end to search and find,
Her fighter tells his ancient tales.
Orc encampment 2
For two days after the invasion, there will be an orc encampment.
Within this encampment, there are about twenty-five elves are in cages; one of the elves looks like Elydir but younger. There are ten large orcs are camping.
A black ornate tent is next to the fire. The same symbol on the messenger stone is on the tent. Two orogs guard this tent. Inside the tent, is Qa’por. If she sees the players, she will try to attack them and subdue them, to capture them for torture.
The Forest of Beasts
Chapter 5
The people of Aymeluma rarely travel into the forest of beasts. Packs wolves often roam, there have been sightings of owlbears, and there are tales of a great eight legged beast that roams at night. The elves don’t hunt in the forest as it’s difficult to track creatures.
Deep in the Forest of Beasts, Briid the Wolf Mother sends her wolves to drive the elves from Aymeluma. While she believes she is serving Silvanus, she has been tricked into these actions by a projection of Elydir.
To the north west of Aymeluma, druids worship Silvanus. Their relations with Aymeluma have been good. Briid once lived here, until she was exiled due to her extreme attitudes towards Aymeluma.
Random encounters 2
| d6 + d4 | Encounter |
|---|---|
| 2 | Deer corpse |
| 3 | [Binding roots](#binding roots) |
| 4 | Distant howling |
| 5 | False trail |
| 6 | Hidden bundle |
| 7 | 1d4 Wolves |
| 8 | 1d4+1 Bandits |
| 9 | 1 Giant spider |
| 10 | 1 Owlbear |
Deer corpse 2
An stench fills your lungs, rotten flesh and blood. The trail is unclear. The forest is quiet all around you, the trees stand still.
If a character makes a successful DC 13 Wisdom (Perception) check, they will find the source of the smell.
You find the source of the stench. The partial remains of a deer.
This deer has been killed by wolves and there are lots of tracks all around. A character who succeeds on a successful DC 10 Intelligence (Investigation) check will notice that this deer was killed by wolves and a trail of bloody wolf paw-prints giving an advantage to the next check to follow the trail.
Binding roots 2
The path descends into a gorge, you can’t see the end through the trees. You can see the bare roots of trees covering the floor.
The gorge is 100 foot long and covered in roots. Once a character reaches 50 feet into the gorge, the roots start grasping at the characters.
If a character succeeds on a DC 15 Wisdom (Perception) they will notice the roots moving. While in the area, and the roots are grasping, a character must succeed on a DC 11 Strength saving throw or be restrained. While restrained, they take 1d4 bludgeoning damage.
Each 5 foot square of roots has an AC of 12 and 4 HP. They have vulnerability to fire.
Climbing up the walls of the gorge takes a DC 13 acrobatics check to escape.
Distant howling 2
The forest stirs with a gust of wind. You hear wolf howls in the distance.
If the characters are travelling, read the following description:
The trail is difficult to follow.
If one or more of the characters make a successful DC 14 Wisdom (Perception) check, they will identify that the wolves are in the east. If they choose to follow the howling, they get an advantage on the check to follow the wolf trail.
If the characters try to continue to find the path, they will get a disadvantage on the check to follow the wolf trail.
False trail 2
This encounter occurs only if the characters are travelling, otherwise, treat the result as no encounter.
A foot trail cuts across the wolf trail.
Briid left this trail. Following it in either direction leads to a spiked pit (see “Sample Traps” in chapter 5 of the Dungeon Master’s Guide).
If the characters follow this foot trail and attempt to return to the wolf trail, they will get a disadvantage on the check to follow the wolf trail.
Hidden bundle 2
This encounter occurs only if the characters are travelling, otherwise, treat the result as no encounter. If at least one of the characters has a passive Wisdom (Perception) score of 11 or higher, read:
A corner of leather pack peeks out of the snow.
In the pack is 1d4+1 electrum pieces and a tarnished gold amulet in the shape of bug.
The trail is clear and the characters don’t need to make another survival check to keep on following it.
Wolves 2
If at least one of the characters has a passive Wisdom (Perception) score of 11 or higher, read:
Wolves howl nearby, too close for comfort.
If more than one wolf is present, the others are close by. If none of the characters has a passive Wisdom (Perception) score of 11 or higher, the wolves catch the party by surprise.
If a single wolf is remaining, it will attempt to flee towards the Hollow Oak Tree.
Following its trail will grant an advantage on the next check to follow the wolf trail.
Giant spider 2
If the characters are travelling, read the following:
Large webs cover between trees. The wolf tracks cut through, under the webs.
The webs are connected to the spider’s Web sense. If the players try to circumvent the spider’s lair, they have a disadvantage on their next check to follow the wolf trail.
In the lair, there is 1 giant spider and 1d4 spiders. Hungry and waiting patiently, they will ambush any prey foolish enough to enter. There is a dead human cocooned and hanging wearing commoner clothes. If searched, the human has 9 sp in its belongings.
If the characters are resting and at least one of the characters has a passive Wisdom (Perception) of 13 or more, read:
You hear clicks and a creak. A giant spider scuttles down the nearby tree.
If none of the characters has a passive Wisdom (Perception) of 13 or more, the giant spider catches the party by surprise.
Bandits 2
These bandits are hostile, looking to prey on people in the woods. There are 1d4+3 bandits.
If the characters are travelling, read the following:
You hear boisterous laughing and the light of a fire in a clearing up ahead.
If the characters are resting and at least one of the characters has a passive Wisdom (Perception) of 11 or more, read:
You hear a branch snap and see the outline of a crouched figure in the underbrush.
The other bandits will be close by.
Owlbear 2
If at least one of the characters has a passive Wisdom (Perception) of 11 or more, read:
There are deep scratches in the bark of the trees. Bushes have been trampled.
If the characters are moving quietly and not carrying light sources, they can try to hide.
The owlbear is hungry. If it loses more than half of its hit points, it flees into the forest.
The characters have a disadvantage on the next check for following the wolf trail.
Following the wolf trail 2
As you travel into the woods, it gets cold and snowy. The warm and safe feeling of Aymeluma quickly leaves your body.
The wolf trail is 6 miles long through the forest. The forest is difficult terrain. A character must succeed on a Wisdom (Survival) DC 15 check to follow the trail. On a success, the characters successfully follow the trail - for every half an hour of travel, they go half a mile. On a failure, it takes 1 hour to find the trail again.
Each day that passes, the add 3 to the Wisdom (Survival) DC to follow the trail.
Encounters 2
Random encounters. Check for a random encounter after each 30 minutes of travel. An encounter occurs if a result of 15 or higher is rolled. Don’t check if the characters have already had three random encounters outdoors in the past 12 hours. After each encounter, the characters must make another survival check to follow the trail.
Fixed encounters. The river encounter will be found after the 4th mile.
River 2
The characters can only encounter this once.
You can hear water rushing ahead of you. A river flows quickly, it’s 4 feet deep and 15 feet across. The wolf tracks lead into the water. To your left, a waterfall crashes down a 20 foot cliff onto rocky outcrops. Tall trees and mossy boulders line the waters edge. Slime covered stones peek out of the water.
Using the stones, a character who makes a successful DC 13 Dexterity (Acrobatics) check will successfully cross the river. On a failure, the character must make a DC 13 Strength save to avoid being dragged over the waterfall edge.
Wading across the water, a successful DC 13 Strength (Athletics) check. On a failure, the character is swept away with the current over the waterfall edge.
A character who is swept away with the current over the waterfall edge will take 2d6 bludgeoning damage from the fall.
To climb up or down the cliff, a character will need to succeed on a DC 15 Dexterity (Acrobatics) check. On a failure, they will fall and take 1d6 bludgeoning damage.
The characters have a disadvantage on the check to follow the wolf trail.
Hollow Oak Tree 2
Outside 2
The path slopes down into a crater. In the the centre is a giant oak tree. Its branches are bare and leaves cover the ground. Small pools steam around the crater. An organic passageway flows into the tree.
A pack of five wolves lies outside the passageway, sheltering under the tree’s branches, one stands watching around.
The tree is over 100ft wide and 250ft tall
The wolves are guarding the entrance and will attack to ward off intruders. Any character that tries to sneak past must make a DC 18 check on a if approached and will protect the entrance.
1. Entrance 2
If the characters have attacked the wolves outside, characters hear the a woman pleading to help from a projected image of Elydir posing as a servant of Silvanus, who abandons her. Read the following description:
A thick pillar of smooth wood grows in the middle of the room. Animal furs cover the walls and rickety wooden furniture leans against the natural wooden walls. Carved bowls overflow with fresh nuts and berries. Scattered candles cast a dim light. Incense smoke fills your lungs.
To your left, hanging furs hang as a doorway. From here, you can hear two women arguing.
“They’re here, they’re here,” one cries. “They’re going to kill us. Please protect me.”
“You served your purpose. Go now and die in what way seems best to you,” a cold voice says.
It grows quiet, apart from sobbing.
2. Druid living area 2
Read the following description when the characters enter:
A small bed covered in animal furs leans against the wall. In the centre of the room is 15 foot diameter chalk circle; at the centre of the circle, more furs.
A woman wrapped in animal furs sobs. She stands in the way of two wolves.
Briid is a human Druid. She carries a gold amulet, the golden oak amulet, in the shape of an oak leaf (5gp) as her spellcasting focus and a gem worth 10gp on her person.
When she casts entangle oak roots and branches sprout from the tree instead of grasping weeds and vines.
Roleplaying Briid the Wolf Mother 2
Briid, a thin young woman with blonde hair, has absolute faith in her purpose to serve Silvanus to reclaim the hot springs and Aymeluma back for him. However, it has not been a servant of Silvanus appearing to her but Elydir. Briid cares about her wolf pack over everything else. Her attacks on Aymeluma have come at little cost.
She will not attack the characters first, if she is cornered with her wolves. She will plead with party to let her wolves free as she doesn’t want them harmed and will offer to have the players take her life in exchange for the wolves. She will explain that, without her leading them, they will avoid the village.
However, if she learns of the party’s approach and they have been travelling for a few days, Briid will bring the fight to them.
Whether or not the party let the wolves go, Briid will want revenge them through their deaths. While she may have agreed to allow the characters to take her life, she won’t give it willingly.
3. Store 2
Small pots and barrels cover tottering shelves. These are filled with various potion ingredients, nuts, dried berries, and dried fruit. A small chest sits in the middle of the room.
The chest contains 4 gp, 3 sp, and 35 cp, a potion of healing, and a 10gp gem. There’s enough dried food for 10 rations.
Silvat
Chapter 6
A path connects Aymeluma and the settlement, through the forest of the beasts. However, the entrance to the druid settlement is hidden in location by a maze designed so that only those connected to nature can reach through it.
Silvatan lore 2
The Silvatans know the following:
- Briid was exiled by Yorhorn instead of killed as an act of mercy after she tried to kill Yorhorn.
- The Silvatans sing of the shared warmth between the villages of Aymeluma and Silvat and an ancient agreement.
- Briid wanted the Silvanus druids to attack Aymeluma but most disagreed because of the good relations.
- Briid said she was seeing an avatar of Silvanus. But it was only cold dread that the villages could feel.
- THe Silvatans occasionally trade with Aymeluma for gold.
Path 2
The path to the Druid settlement is 2 miles long. Check for a random encounter after each 30 minutes of travel. An encounter occurs if a result of 15 or higher is rolled. Don’t check if the characters have already had three random encounters outdoors in the past 12 hours.
A narrow path goes to the north west. While the path is easy to follow, vines and roots make this path difficult to walk.
Druid maze 2
Read the following description when
Ahead of you, the trees and undergrowth grow intertwined to form a 5ft wide tunnel, tall enough to walk into. The walls of the tunnel are thick.
Before the entrance of the maze is a carved wooden sign.
Without the secret of heart,
Far you will walk and wander,
But danger in times’ squander,
And you cannot dream to part.
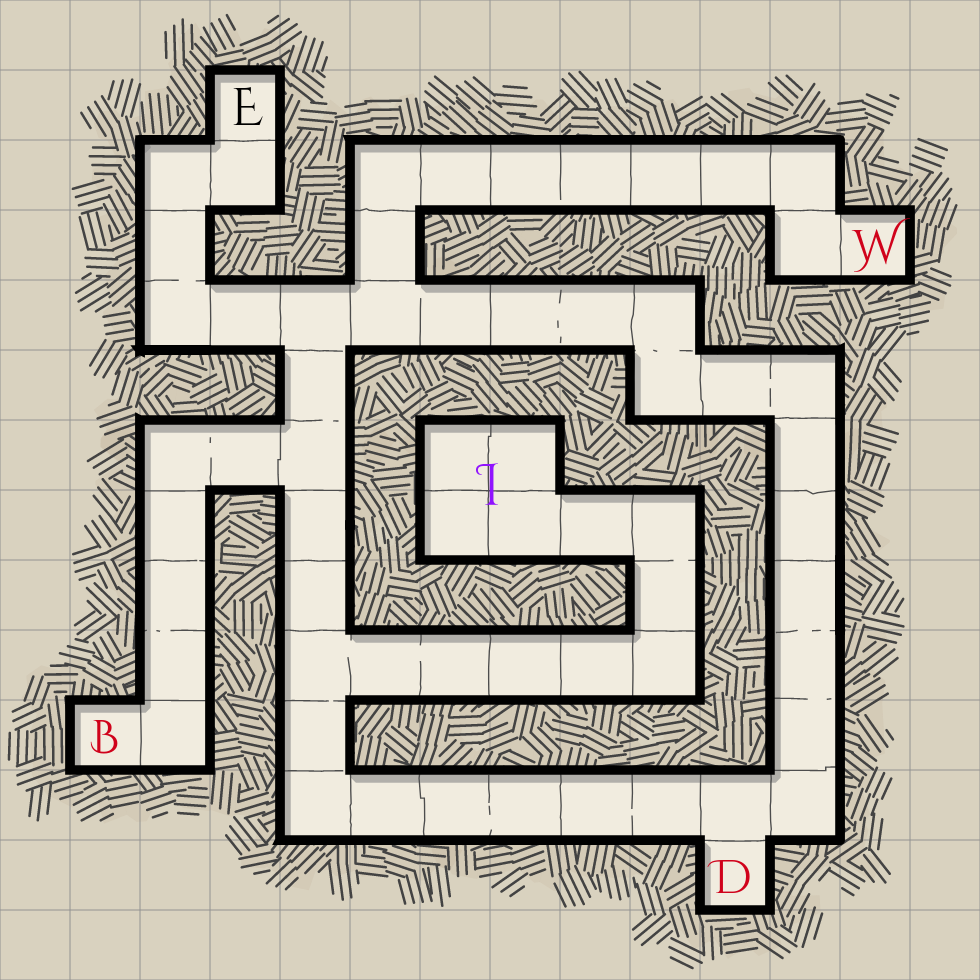
Exiting the maze 2
Each tile has three exits, the wolf (W) exit, the owl (O) exit, and the bear (B) exit. Each time the characters arrive leave through an exit, add a new tile to the maze, connecting the E of the new tile to the exit the characters left through. To exit the maze, they must exit a tile first by the owl, the next tile by the bear, and the final tile by the wolf.
When the characters first reach the Wolf statue, read the description:
In the tunnel, a wooden statue of a wolf, mid step, stares out further into the maze.
When the characters first reach the Owl statue, read the description:
In the tunnel, a wooden statue of an owl, wings stretched in mid flight, stares out further into the maze.
When the characters first reach the Bear statue, read the description:
In the tunnel, a wooden statue of a small bear, mid step, stares out further into the maze.
If the characters try to break out through the walls, read the description:
As you damage the walls, vines and branches regrow quickly to fill the area.
Centre room 2
At the centre of each tile, I is a room with the following text:
Four large trees grow tall in each corner of the room, their canopy like a vaulted ceiling. Light trickles through, illuminating a wooden podium into which words are carved.
At first my beak is sharp,
Then honey stops the hunger’s smart,
Until at last I howl to the moon,
Follow me and we will part.
For each tile the party has successfully travelled through, the associated text for the exit for that tile will have disappeared from the riddle room.
The awakened tree 2
Defending the maze is an awakened tree. This trees can move through the walls of the maze. Each time the characters move within range, the tree will attack once and then disappear through the walls of the maze. To determine the location of the tree, roll two d10s. The first is the horizontal location of the tree left-to-right, and the second is vertical location top-to-bottom. If the tree is in the path, it will be indistinguishable from a wall and block the path, if it’s in the wall, it will be indistinguishable from the wall its in. Determine the tree’s location whenever the characters move to a new tile or after the tree moves.
Druid settlement 2
Once the characters have exited the maze, read the following:
Tall pine trees circle three wooden buildings, each shaped like the shell of an acorn. The closest is larger than the others and its door faces the maze exit. You smell the smoke which drifts out of the top of each. Around the buildings, six oak leaf shaped pools steam making . You can see a few elves, half-elves, and humans working in the area around it.
Each building is very similar.
A large fire provides a little more warmth for the building. Druids, wrapped in thick furs, work. Most are working while around the fire. A chatter fills the air, like the smoke from the fire. You can hear a working song about a seed of warmth that flows
In the larger building:
A half-elf man and an elf woman stand chatting. The man stands tall, a golden crown in the shape of twigs and branches on his head and wears well maintained fur robes.
The man is Yorhorn and the woman is Endi.
Roleplaying the Silvatans 2
Yorhorn (NG half-elf man) is an intimidating man who stands tall, and speaks rarely and softly. He is protective of Silvat and his inhabitants. He is too trusting, showing too much compassion and mercy to those who oppose him. In addition to the information that the Silvatans know, Yorhorn met an elf woman from Aymeluma who traded a gold leaf for some magic. Yorhorn gave the gold leaf to Briid, who was a child at the time. He can’t remember what the trader looked like, other than she was an older woman who wore a purple cloak with gold embroidery.
Endi (NG half-elf woman) is very popular and always has a sympathetic ear. She believes it is important to achieve your goals and protect Silvat. She believes cleanliness is a waste of time - it’ll just get dirty again. She encouraged Yorhorn to banish Briid.
Axilya (CN elf woman) wearing simple, practical clothes, and a well-worn travelling cloak. She is a socially awkward. She believes it is important to connect with nature and take everything in moderation. She believes excelling at a skill isn’t all it’s cracked up to be. Axilya knows of the location of the Wellsprings of Vitality. She will agree to take the characters to the Wellsprings in return for some ammo for hunting.
Wellsprings of Vitality
Chapter 7
The Wellspring of Vitality flows and warms. The bitter cold of Denau makes it impossible for many to survive but the Wellspring’s hot waters gives life a chance to endure and, at times, thrive.
The origins of the springs have been forgotten by most. A final alliance between Aymeluma and Silvat combined magic with the nature of the fire deep in the mountain when the cold arrived from Elydir over 500 years ago.
The Icebringer’s Ictus have twisted the purpose of the enchanted gems of this spring, which enhance the power of the molten earth below, to freeze the incoming water - preventing the flow of new hot water.
Now the power of the springs is waning, and soon, all those who live in its warmth could perish.
Random encounters 2
Check for an random encounter whenever the party, backtracks, rests for 10 minutes, or attracts attention. On a result of 18 or more, a random encounter occurs.
| 2d4 | Encounter |
|---|---|
| 2 | 1 Chuul |
| 3 | 2 Cult Fanatic |
| 4 | 2d4+1 Cultists |
| 5 | 1d4+1 Ice mephits |
| 6 | 2d6+4 Giant rats |
| 7 | 2d4+2 Dark Mantle |
| 8 | 1 Snow golem |
Chuul
Cult Fanatic
Cultists
Ice mephits
Giant rats
Dark Mantle
Snow golem
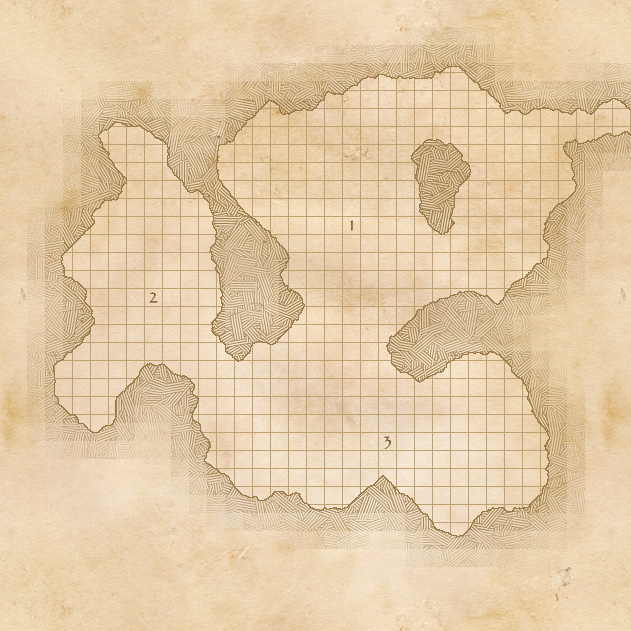
Outside 2
Approaching from a distance:
You glimpse the nearing mountains through the tops of the trees. The hills getting steeper towards the mountains. As you climb, the wind bites and whips at you.
From close by:
The trees give way to a 30ft semi-circular clearing below a cliff, the tall mountains hiding the sky above. An entrance to a cave tunnel is 10ft up the cliff face. Four thuggish humans huddle around a fire in the clearing below, pelts and tents breaking the wind. A figure cloaked in ice blue stands in the cave entrance, mostly looking out and occasionally scowling down at the people below.
The thugs and cultist fanatic have been told by the cultists to defend the entrance of the caves and not let anybody in. They will aim to discourage others from entering before fighting (it’s easier money to not die).
The cultist at will to warn the other cultists inside that others are coming.
A character must succeed on a DC 13 check to climb up the cliff-face.
Upper cave 2
The upper cave is cold and icy. The cultists have wrestled control over it and have frozen the waterfalls.
B1. Entrance tunnel 2
The natural tunnel twists into the mountain, frost covers the surfaces. With each step the air gets colder but stiller.
Each of the other tunnels in the cave are also frosty and cold.
B2. Lake room 2
An irregular trench cuts across this cavern from east to west, a thick layer of ice covering the bottom. Inside the channel, twelve cloaked figures, robed in icy blue chant. The figure closest to the back wears larger and brighter robes. A small spectral orb floats in the centre of the room above them, thick snow spilling out of it.
At either end of the channel is a smaller tunnel. To the north, opposite to the entrance, a passageway is blocked by fallen rock. The cavern is 30ft at its widest, 20ft at its tallest, and 40ft long. The channel is 20ft wide in the middle, 10ft wide at the edges, and 10ft deep.
In the space south of the trench, fragments of a shattered stone tablet lie on the floor, below a podium.
If the characters enter the channel, read the following description:
At the bottom of the channel, below the ice, two thick veins of metal runs through it. The channel slopes upwards slightly to the east.
The bottom of the channel is slippery ice (DMG p110).
One of the ice worshippers is a cult fanatic, Morrow, the others are cultists. The ice worshippers are chanting to open a small portal to the ice realm. They will accelerate their efforts if they are interrupted, aiming to open a smaller unstable portal. At the end of each round, check if the ice worshippers are successful in opening a portal. Roll 1d20, if the result is less than the number of cultists chanting, open a portal in the centre of the room, bringing in 1d4 ice mephits. This can be done at most 10 times in 24 hours.
If the characters inspect the broken fragments, give the characters the dungeon puzzle.
The blocked passage leads to the passage opposite B6, the channels leading to the east and west portions of B3.
B3. Water channels 2
The icy floor is difficult to walk on and the cold seeps through your boots. Two thick metal veins follows underneath the ice.
When the water is following, it is difficult to travel through the channels.
If the character falls into the water, they must make a DC 14 Strength saving throw or be swept downstream, taking 1d8 points of bludgeoning damage.
The bottom of the channel is slippery ice (DMG p110).
East
This connects area B2 to areas B4 and B5, the passage splitting as it goes along.
West
This cuts across the main passageway (area B6), between areas B8 and B9, then curves towards area B9, joining the channel from area B8.
B4. East waterfall 2
A waterfall of ice flows down the east wall around a vein of thick metal into the channel. Set into the ice at the top of the metal vein is a large blue gem.
A tunnel to the north leads to B5 and the channel leads to B2.
The blue gem is a Nixignis Gem. Once removed, the waterfall will slowly melt over 24 hours.
B5. North east waterfall 2
A waterfall of ice flows down the north east wall around a vein of thick metal into a channel.
A skeleton lies in the corner, a small pack to its side.
Five angular winged creatures with blue skin breath fly near the waterfall. One breaths frosty breath onto it.
The tunnel to the north is the entrance to area B6.
There are five ice mephits in this room who are trying to keep the waterfall frozen until the cultists sent below return with the final gem. If they are stopped, this waterfall will melt in 6 hours.
If a character succeeds on a DC 13 medicine check, they will find that the skeleton belongs to an elf. On the skeleton, is a [Ring of Fire Resistance]. The pack contains a Lantern of Revealing, and 12gp.
B6. Main passage 2
This walls of this stone passage are smooth. The moss on the walls turned to ice. Sounds echo along this otherwise silent corridor.
This passage starts at area B5 and connects to areas B7, B8, and B9. Between areas B8 and B9, the west water channel (area B3) cuts across this. A passage to B2 is blocked.
If the characters reach the west water channel for the first time, read the following description.
A channel cuts across this corridor, ice at the bottom.
After the waterfalls have been melted and the characters reach the water channel, read the following description:
Water rushes through the channel in this corridor, spraying on each side.
B7. Stairs 2
From carved stone stairs, warmer air rises and, with it, a smell of damp and mildew. Water trickles down the steps from slowly melting ice.
On each side of the stairs, a stone statue of an elf stands, each with their hands outstretched and a rising sun emblazoned across their robes. At the bottom of the stairs is a dark room.
These are Fire-breathing statues, with the fire coming out of their hands. The pressure plate covers the space across the stairs.
The stairs start connected to B6 down to C1.
B8. North west waterfall 2
This is a very cold cave. A waterfall of ice flows down from the north west into a channel. Inside the ice, one foot in, you see a blue gem.
Two figures cloaked in elegant blue robes stand watching the cave entrance.
Two cult fanatics guard the gem in this waterfall, talking about the flying serpents below.
B9. Whirlpool 2
Carved into the ground of this large cave is a huge funnel, 30 feet across, its walls coated in ice. At the bottom, a 5 foot wide dark void swallows the dim light of the room. A channel from the north connects parallel to side of the funnel, at the point closest to the entrance. Three metal veins, starting from the channel, spiral around and turn into ice covered poles, equidistant down the funnel’s hole.
A skeleton lies in the corner of the cave.
The bottom of the channel is slippery ice (DMG p110).
If a character succeeds on a DC 13 medicine check, they will find that the skeleton belongs to an elf. Between the bones is a spell scroll of Stone Shape and 2 gems worth 10 gp each.
Lower cave 2
The lower cave is warmer than the upper levels, though it’s not hot. The cultists have struggled to gain control over this level. Initially, they travelled with force to steal the Nixignis gems from the deep but were thwarted by the Couatls, Tlene and Icpi, though Tlene was also slain in the process.
C1. Stairs 2
Warmer air flows from two carved stone corridors, one to the east and one to the west.
C2. East reservoir 2
Once area C5 has filled with water, this cave refills at 5ft per hour per waterfall, up to the top of the empty basin.
When the characters enter this reservoir, read the following description if the water isn’t flowing:
This giant reservoir is empty of water, a large island, now a hill, in the centre. A 10 wide channel opens into the reservoir, 25 foot up the south west wall, the shadows beyond impenetrable.
To the north of the reservoir stands a 30 foot tall slimy cliff atop which a tunnel exits. A boat hangs down the wall, chained to the top of the cliff.
Read the following description if the water isn’t flowing:
Water surrounds a large island at the centre of this reservoir. Water flows in from a channel on the west wall, the shadows beyond impenetrable.
To the north of the reservoir, a tunnel exits onto a short dry cliff. A chain hangs down into the water.
Then, read the following description.
At the top of the island, a hunched old man sits near a small fire, staring into it, a bag of weapons to his side. Closer to the man, a mound, shaped in a crescent is covered in a sheet.
At the edge of the island, to the east, a few small bunched mounds are covered by a white sheet. Nearby those, two unconscious blue robed figures are tied up.
The channel in the south west wall of the basin leads to area C4. The tunnel leads to area C1.
A character who succeeds on a DC 15 Strength check can pull the boat up using the chain.
The man at the centre is Icpi, Icpicoualt, (LG Couatl male) in the form of a Veteran male. Icpi is mourning the loss of his mother, Tlene (Tlenenepilcoualt), and is planning on burning her body. He has been tasked by his mother, and therefore the gods, to prevent the power of the Nixignis gems from being used for ill. Tlene had protected these before against the ancient wizard who used the lava cavern as its base.
Icpi is not quick to trust others and will be fearful of. He will use his abilities to mind read copiously, and be very questioning of any other creature’s purpose here. He will be evasive of any questions and will try to lead others seeking the Nixignis Gems away. If he believes there are those that will help, he will ask them to return the Nixignis Gems to their rightful place and to drive any remaining cultists from the caves. In return, he will warn them of what is likely to happen once the water flows again and will offer to help them escape when the time comes. He also knows of the flameskull in the Lava Cavern.
Beneath the white sheet closest to Icpi is the corpse of Tlene. Under the other sheet are corpses of the cultists who failed. Icpi is also planning on burning those corpses, out of respect, though he doesn’t know that this would be blasphemous to them. If a character succeeds on an DC 12 Intelligence (Investigation) check, they will see that none of the corpses have weapon marks on them, but bite marks.
The fire at the centre of the cavern is incredibly hot, despite its small size. At the centre of it, is a Nixignis Gem.
A character who attempts to scale the cliff, either up or down must make a DC 14 Athletics (Strength) check or fall, taking fall damage. If a character attempts to climb around the cavern, they must succeed on a DC 16 Athletics (Strength) check or fall.
C3. West reservoir 2
Once area C5 has filled with water, this cave refills at 5ft per hour per waterfall, up to the top of the empty basin.
When the characters enter this reservoir, read the following description if the water isn’t flowing yet:
This large cave has an empty basin. A makeshift ladder climbs down the 30ft slimy basin cliff, at the top of which a tunnel exits further to the north east. Strewn around the bottom of the ladder, slime covered corpses lie disfigured.
To the south, 25 foot up the basin wall, a dark tunnel stares out at you.
If the cave is is refilled, read the following description:
Apart from a small area of ground to the north, this large cave is flooded with water. A makeshift ladder floats on the water. A couple of slime covered disfigured corpses lie half submerged at the edge of the water. Water flows into the cave from a channel in the south.
If the cave doesn’t have any water in it, at the bottom there are three gelatinous cubes, staying perfectly still. One is directly at the bottom of the ladder, waiting for an unlucky visitor. If the cave is filled with water, the gelatinous cubes will be waiting just below the water at the edge of the cliff.
A character who attempts to scale the cliff, either up or down must make a DC 14 Athletics (Strength) check or fall, taking fall damage. If a character attempts to climb around the cavern, they must succeed on a DC 16 Athletics (Strength) check or fall.
The tunnel to the north east leads to C1, the tunnel to the south leads into C4.
C4. Water passages 2
Once area C5 has filled with water, this is flooded.
Read the following description if the water isn’t flowing:
The tunnel floor and lower walls are smooth and slippery. Stalactites hang down from the ceiling.
Read the following description if the water is flowing:
The water flows quickly through this channel. Stalactites hang down from the ceiling.
The water is flowing at 5 feet per second.
There are six dark mantles in the main passage that exits C5. When a creature approaches them, they will use their darkness aura to surprise the unsuspecting victim. Read the following description if this happens:
The room plunges into darkness. You hear popping and squelching above you.
This passage connects areas C2 and C3 to area C5.
C5. Stairs to the deep 2
This cave refills at 5ft per hour per running waterfall, up to 40ft.
When the water isn’t flowing read the following description:
This large square room has been slowly softened by time.
When the water is flowing, read the following description:
Water fills this large square room.
Then, read the following description:
The smell of sulphur fills the air. A plateau, 80ft high and 20ft wide, stands in the centre. Half way up the plateau a stone protrudes out and, from it, a 10 foot wide staircase climbs around the plateau. Four statues stand atop it, watching out to below. The air around shimmers like them air on a hot summer’s day.
Two corpses lie broken on the protrusion, dried blood covering their clothes. To the north east and south west, tunnels exit 20ft up into room.
The statues are [animated armour] and will activate when creatures reach the 3rd on the steps. The corridor to the north east leads to area C4 and the corridor to the south west leads to C6.
When the characters reach the top of the stairs, read the following description:
A glowing red light emanates from a spiral, causing the air to shimmer around it. You feel hot dry air flow from it, along with the stench of sulphur.
The stairs lead to area D1.
C6. Whirlpool 2
This huge cylindrical room has been cleanly hewn from the walls. The ground feels warm below your feet though the air falling down from the small hole at top. Three metal poles stick around the centre of the room from the floor to the ceiling.
The hole in the top leads to area B9. A corridor leads to area C5.
Lava cavern 2
There is a Flameskull hiding in the lava which wants the Nixignis Gems, created by its long-gone master to protect them. The magic of the cave protects the Nixignis pyramid from undead when powered. If the gems are in place, any undead within a 60ft of the platform become frightened of the platform.
The Flameskull is intelligent and will choose a moment with advantage to attach the anybody who has the gems. It will try to convince the characters to give it the gems, if the gems are returned to their place.
Throughout the buildings of the lava cavern, there is weakened floor. If a character steps on the weakened floor, it will collapse, and the character must succeed on a DC 10 dexterity saving throw or fall into the lava.
A creature takes 6d10 fire damage when it enters lava for the first time on a turn or when it ends its turn there.
D1. Broken staircase 2
The spiral staircase is built into a huge stalactite. The tower below. The remaining tower built up to reach it has collapsed.
The staircase spirals down, hewn into natural rock. Sconces spread a dim red light from the walls.
130 feet down the stairs, the stairs end, leaving a 40 ft drop to a tower below.
The staircase ends in the air in this huge lava flooded cavern. Three features stand out of the lava 80 feet below: a fragmented castle, with a half-broken tower; a hexagonal pyramid, with three large statues standing at the top; and a broken bridge between. The half-broken tower reaches towards the staircase, leaving a 40 foot gap. Around the tower, you see a few bodies wearing blue robes, some burnt, some broken. A knotted rope hangs down from the staircase to the tower below.
D2. Old castle 2
The floor of the castle is 10 feet above the lava.
The old castle’s foundations and outer walls are broken in many places, leaving pools of lava below. Areas of the floor look are cracked and uneven. Very little furniture remains. The few inner walls that stand inside are crumbling.
D3. Broken bridge 2
The bridge spans the 60 foot gap between the castle and the pyramid.
D4. Hexagonal pyramid 2
When the characters reach the hexagonal pyramid, read the following description:
Three statues stand facing outwards on ever other side of this pyramid. Each statue holds their right hand low, a diamond shaped hole in their palms; their other hand holds onto the shoulder of the next statue. Between each statue, there are holes to pools of lava below. Metal poles descend from the ceiling to each, wrapping around to form their clothing - the poles split down into each of the lava pools. The statue facing the left of the bridge is a man wearing armour fashioned after oak leaves. The statue to the right of the bridge is a woman wearing a tunic with images of fruit and harvest and her hair covered in carved wildflowers. The statue facing away is wearing a plated armour, a helmet concealing his face.
The statues are Silvanus, Chauntea, and Helm.
Restoring the Nixignis gems to this structure will return the heat to the metal conduits that run to the waterfalls. For every gem restored and each thirty minutes thereafter, the water level in the dungeon rises by five feet. After an hour, the water also becomes to hot to touch in the lower cave. Any creature who touches the hot water must make a DC 13 dexterity check. A creature takes 1d10 fire damage on a failed save or half as much damage on a successful one.
When the characters restore a gem, read the following description:
From each of the gems across the metal flows a golden light. The light flows along the poles towards the roof of the cavern.
When a gem is restored, the Nixignis Gem goes into hot form.
Carnelu
Chapter
Carnelu 2

Village of about 800 people.
The Toad’s Inn 2
The inn is a single storey half-timbered building, with dwarf-wrought iron tables and chairs. It is well lit by an iron chandelier. Accommodations consist of several hammocks in the common room. Very popular with the locals, has very poor accommodation and food but cheap and plentiful beer. The innkeeper is a willowy female human named Suse.
The Grey Huntress 2
The inn is a grand half-timbered building, with carved wooden doors. Accommodations consist of several large rooms with beds and woollen mattresses. The inn is locally known for the variety of its meads and wines. The innkeeper is an old male human named Altes.
Market 2
There’s a small market which has general, easy to buy wares. There is a travelling merchant who will sell finer wares.
Cavern of Stars
Chapter
Cavern of Stars 2
A tranquil monastery built into the mountain, into a cave of luminescent gems. Many of those, who still the many who mourn their lives or losses travel here to meditate in peace. Only those given permission by a Planetar, Mydaiel, can enter into the Cavern of Stars.
It is staffed by Hound Archon’s, who act as caretakers, guards, and administrators of the monastery. There are two guards, three caretakers, and one administrator.
Silence is expected in the Cavern of Stars, though telepathic communication and non-verbal communication is allowed. The patients are likely to report anybody unexpected to the Hound Archons, though this won’t be taken seriously immediately because of how unexpected and unlikely it is.
Any visitors who break these rules will be asked to leave by the Hound Archons, though only the guards will show force, and even that will only be in the most dire of situations. The Hound Archons will alert superiors if anybody breaking the rules appears.
The inside of the Cavern of Stars is Hallowed. Celestials are excluded from the normal effects. In addition, bright light fills the area. Magical darkness created by spells of a lower than level 8 can’t extinguish the light.
Cavern of Stars Interior 2
In the deeper interior, the corridors and rooms have the following description
The walls and floors are the same material as the outer cave but are polished instead. Carvings with markings filled with gold, and painted murals cover the walls depicting peaceful vistas and godly figures. Occasionally, there is a statue of an angel or other angelic being.
The Grand Doorway 2
The path is steep up the mountain. To your right, a steep valley with a river flowing through it; the river flows from out of a cave below - a light shining out of it.
At the end of the path, large marble doors are built into the cliff. Two angelic statues stand beside the door, holding their swords over the doorway. A large garden is built around the doorway and statues, filled with small water features, benches and chairs.
Just in front of the marble doors, a single Hound Archon is standing guard.
A main door is guarded by a Hound Archon, Drammer. He is under orders to guard the entrance and to allow pre-agreed people into the monastery. These must be checked with the monastery administrator on their arrival. He is a loyal guard and follows these orders without question or hesitation, though perhaps a little too the letter.
Morcanloth may be “resting” in the gardens in a new disguise, if he reaches the Cavern of Stars before them.
Behind the large doors, you can see a corridor. Bright light, as if it was a bright summer’s day, shines out from inside. Deeper inside, it glistens.
This doorway leads to the Balcony of Joy.
Balcony of Joy 2
You walk into a marble entrance hall and out onto a huge white stone balcony that overlooks an immense cavern. The cavern’s surface is covered in sparkling stones and iridescent gems. Millions of pinpricks of light shine upon you from the walls - though you can’t see a light source. The cavern is roughly circular, about 100ft across in all directions, except to the east where it opens out through a natural arch.
Straight ahead, to the north, a huge natural pillar, shining like everything else, rises from the bottom of the cavern. Around the pillar is a marble platform - another garden, somebody tending to it. A bridge crosses from the balcony you’re on across to the central platform.
Across to the north-east there’s a smaller balcony, tables and chairs are laid out. This balcony is separate with no visible pathways to it.
To your left, the balcony narrows to a path around the edge of the cave, reaching a door on the far-west side of the cavern. Another bridge spans from this door across to the central pillar.
To your right, a marble stairway follows around the edge of the cavern, downwards. In the area 50ft below the balcony, a few people are sparring with wooden swords, spears, and staffs. To the east, below the huge archway, is a large silvery lake, a river flows from this out of the cavern, below you, to the south, a bridge crosses it.
Immediately to your left, in the entrance hall, is a marble doorway.
The only sound you here is the water flowing and the wood weapons hitting each other.
If the players are in sight of the door across the other side of the cavern:
Hidden behind the central pillar, you can now see an additional bridge across to another door on the far North side.
There are four entrances and exits:
- the door to the west leads to the West Residency Entrance.
- the door to the north leads to the North Residency Entrance.
- the stairway down to the right leads to Lower Cavern East.
- the door immediately on the left leads to the Administrator’s Room.
Administrator’s Room 2
Orderly scrolls and books line the shelves of marble room. Sitting at a desk is a Hound Archon, deep in its work.
A Hound Archon, Brammer, is the administrator of the Cavern of Stars.
If he meets the characters, he will ask who they are and will check to see if they are allowed in. If not, he try to escort them out.
Cavern Pillar 2
Around the central pillar, is a beautiful garden. Trees flourish, the beds are full of strange and wonderful flowers, huge ivies drape over the edge. A dwarf, dressed in white, tends the gardens in silence. A Hound Archon dressed in robes stands with them.
The dwarf is Anden Barrelback
River From a Cavern 2
A wide river runs out of the cave, the water runs quickly. Walking through the water directly will take a DC17 strength check. Hanging on the edges will take a DC16 strength check.
This river leads into the cave, a bright light shines.
Read a modified version of the Balcony of Joy if the players successfully enter this way.
Lower Cavern East 2
A stairway curves up towards the upper balcony.
Lower Cavern Training Area 2
A large marble floor with wooden weapons. An elf, Ayas Virrin, and a halfling, Grifo Hopesinger, are sparring.
West Residency Entrance 2
This also applies to the North Residency Entrance:
There are six doors here, three on each the left and the right. The middle door on the right is open. Beside each of the doors is an inscription (in celestial). At the end of the corridor, an archway opens out into another room.
North Residency Entrance 2
See the description for Cavern of Stars Interior.
There are three doors:
- one to the left, to the kitchen, where the characters can smell food being cooked
- to the right is an open door to the storeroom
- straight ahead is a closed door to the baths
The corridor also goes off to the left and to the right, just past the nearest doors.
Going left, there’s a longer corridor, with five rooms on the right and four rooms on the left, and an open archway at the end. The closest door on the left is the library, the rest are abodes.
Going right, there’s a shorter corridor with an open archway at the end.
Gallery 2
Paintings show heroic battles between angels and demons, famous good deeds, Mount Celestia, and magnificent religious buildings. Statues depict gods, the Triad and lesser gods, and angels.
One of these paintings in here shows the Temple of the Corrupt Orb.
Dining Hall 2
A large dining hall with ornate tables and fine cloths.
The child, Kya, can usually be found eating here.
Baths 2
A shared bathing pool is carved into the cave rock, the water flowing over a marble wall on the far side into another huge cave. Despite the cave being the same material as the outside, it’s mostly in darkness, some light from the bathing area reflecting back. Steaming water tumbles out of a hole in the east wall.
A half-elf is bathing.
The half-elf is JJhaan Yelnan.
Storage 2
A storage room full of fine meats and fruit.
Kitchen 2
A Hound Archon is preparing food in here.
Library 2
A large library, study, and art studio. It has large open arched windows that open out into the cavern.
Qia Qian can usually be found here.
Abodes 2
These are the living quarters of the souls who inhabit the Cavern of Stars. Some have been here for months, others, for thousands of years.
Abode 1, Ayas Virrin 2
The door is closed. Ayas Virrin is engraved on a plaque in Celestial on the door.
Inside the room:
A broadsword sword hangs on the wall, ancient runes inscribed, the blade melted. The interior is simple, a bed and a desk. A suit of armour is on a stand, with a sword in hand. Most of the room is taken up by a statue in the shape of a small dragon.
On the desk, is a rough drawing of a woman fighting a dragon.
This is the room of an elf fighter, Aras Virrin, who lost a battle to a young black dragon who stole her daughter. She is likely to be sparring with Grifo Hopesinger in the training area.
The dragon statue will wake if they pick up the sword (and will sleep if they put down the sword). It’s a Young Black Dragon construct. It has the additional damage immunities of poison, psychic; bludgeoning, piercing, and slashing from nonmagical attacks not made with adamantine weapons. It also has the condition immunities, charmed, exhaustion, frightened, paralysed, petrified, poisoned. It has the propoerty Immutable Form. It cannot use its Acid Breath attack.
Abode 2, Anden Barrelback 2
The door is locked. A successful DC 10 Dexterity Check to pick the lock, or a DC 18 Strength check to break the door down. Anden Barrelback is engraved on a plaque in Celestial on the door.
The room’s walls are full of images of plants and fungi. Plants are growing around the room. Two small birds flutter around the room, and a hare bounces around.
This is the room of a dwarf ranger, Anden Barrelback, who became lost and caused his party to die after mistaking two mushrooms - a mistake he never should have made. He can usually be found around the central pillar garden.
Abode 3, Faurin 2
The door is closed. Faurin is engraved on a plaque in Celestial on the door.
His room is full of books and scrolls stacked neatly or on large shelves. A map of Denaura is on one of the walls. A simple bed is in one corner, a large desk in another. A fireplace and a small armchair closer to the entrance.
A human sits quietly at the desk, you recognise him as Faurin, the ghost that you once fought in the Tomb of the Lost Denhari. Though still gaunt and sad, his hair is thicker and his eyes are no longer bloodshot.
This is where [Faurin][faurin] rests. He knows about Elydir’s old plans and her want to combine the pieces of the Staff of Skonarith. He knows the location through the hidden path, and the password to “unbind”.
Abode 4, Isadore of Gillhall 2
The door is closed. Isadore of Gillhall is engraved on a plaque in Celestial on the door.
A man dressed in finery is painting a mural on the wall, tears streaming down his face. A Hound Archon dressed in simple whites stands beside him.
The room is full of fine items, a large bed. Thick curtains cover the walls.
This is the room of a nobleman who died unable to save his town from a flood after warning a sign from the gods. He is usually in his room.
Abode 5, Qia Qian 2
The door is open. Qia Qian is engraved on a plaque in Celestial on the door.
Holy symbols of many symbols cover the room’s walls.
A holy book is on a lectern, a passage highlighted in celestial, “Those who fail to protect their people are not worthy.”
The room of a human priest, Qia Qian who questions his worthiness, despite leading a selfless life. She can usually be found in the Library.
Abode 6, Menna Saz 2
The door is closed. Menna Saz is engraved on a plaque in Celestial on the door.
In a simple room, a woman is leaning against a Hound Archon, weeping quietly.
A human commoner, Menna Saz, who’s wife was evil. She is usually found in her room, mourning.
Abode 7, Grifo Hopesinger 2
The door is closed. Grifo Hopesinger is engraved on a plaque in Celestial on the door.
A room full of statues of gods and angels, large weapons, and suits of armour.
A halfling ancient paladin knight, Grifo Hopesinger who failed to defeat an evil invasion of orcs. She can usually be found training with Ayas Virrin.
Abode 8, Zat-Kor-Zor Zojivihd 2
The door is closed. Zat-Kor-Zor Zojivihd is engraved on a plaque in Celestial on the door.
A very bare room, a simple mattress and a staff.
A human woman wearing simple clothes sits in the middle of the room, meditating, she will open her eyes angrily when the players enter.
A monk who never achieved enlightenment. She is usually meditating in her room.
Abode 9, Kya 2
This door is ajar. Kya is engraved on a plaque in Celestial on the door.
A room filled with toys and simple books. A small bed has a stuffed bear on it.
A human girl, lost and confused. She is usually eating in the dining area. She will be the most likely to talk to the players not truly understanding the rules of the silence, but she will do so nervously. She will become attached to the most human character, or one that shows her the most affection.
Abode 10 2
This door is locked. A successful DC 12 dexterity check, or a successful strength strength check of 18 will open the door. Danger is engraved on a plaque in Celestial on the door.
The room is empty apart from a single flower, dark silver, light silver, and light purple petals.
The door to this room will automatically close if not propped open.
The flower if touched will let out a poisonous gas. Any creature in the room must succeed on a DC 18 Constitution saving throw or be paralysed for 4 hours. If they all succumb, they will be taken to the central pillar gardens.
This flower, the True Angel’s Aconitum, if prepared correctly, can be used to create a Potion of Remove Curse.
Abode 11, Jhaan Yelnan 2
The door is closed. Jhaan Yelnan is engraved on a plaque in Celestial on the door.
A room full of pottery, tapestries, and homely items. A fireplace is built into the corner. Simple hand-made furniture fills the room.
A half-elf, Jhaan Yelnan who accidentally killed inhabitants of a neighbouring village due to an illness. The half-elf can usually be found bathing.
Abode 12 2
The door is closed. Nothing is engraved on the plaque on the door.
The room is empty.
Abode 13, Asimina 2
The door is closed. Asimina is engraved on a plaque in Celestial on the door.
Orbs and scrolls are in piles around the room.
In the centre of the room, an elf in deep red robes chants and moves her arms in complex manoeuvres.
An elvish sorcerer, Asimina, who tried to avoid using her powers during her lifetime. In a moment of desperation, she accidentally destroyed her own village and herself in a surge of wild magic, trying to heal her mother. She spends her time trying to perfect the spells to not have a wild magic surge. She killed her whole family.
If she is distracted, this will fail. She will have a look of terror across her face and scream “nooo-”. As a wild magic surge, she will cast fireball as a 3rd-level spell centred on herself.
Abode 14, Almar Torrie 2
The door is closed. Almar Torrie is engraved on a plaque in Celestial on the door.
The room contains a bed, an easel, and lots of unfinished paintings.
An human artist, Almar Torrie, who failed to complete his work for the local church which was then destroyed in an unrelated lightning strike. He can usually be found in the gallery.
Cloudpeak Monastery
Chapter
Denau Cloudpeak Monastery 2
Cloudpeak Monastery is the lair of a silver dragon, Xolbi who is in human form. This monastery is served by ten acolytes and a priest of Torm.
The monastery is 12 miles from the split in the path, further up the mountain. Players need to be careful they don’t get lost (Becoming Lost p111 DMG) following this path. In the distance, up the mountain, they can hear a bell ring every hour.
After 11 miles of travel up this path (or further if they get lost), the characters will reach a point where the wind calms and the snow stops.
From a distance:
Ahead of you, the cold weather. Huge cliffs of clouds and falling snow surround a temple. The temple leans against the mountain, its walls made of worn stone some of which have crumbled.
The temple has a steep gabled roof, a spire on the left, and a spire missing on the right. It has a door that door faces south. To the west a much smaller adjoined building connects to the west, nestled between the mountain and the temple.
To the east, there is rubble with a large bell sticking out of the snow.
They won’t be able to hear anything from the outside but on a DC 16 Wisdom (Perception) check, they will see movement in one of the towers. The acolyte on watch, Jrena, has a passive perception of 11 and, if she sees the players, she will warn Xolbi that they’re coming.
As the players approach the building from a distance:
You see that, what originally looked like broken walls there are clouds holding in shape. The missing spire and bell-tower are also fashioned in this way as well. The door will have the symbol of a right hand gauntlet with the palm facing forward, a closed eye facing outward.
When the players get close to the door, the eye will open, and a sound will come from it. It will pose them a question:
Welcome, travellers, to Cloudpeak Temple. To enter here, you must answer my question truthfully:
You’re in a conference with a being of incredible might. This being has given you an offer - peace and tranquility for all of those in the world. However, it’s at a price. You must choose a innocent creature, an innocent child of a farmer who is your friend, and torture this child for eternity. On this child’s tears, this new world would be built.
Answer me honestly, each of you, would you take this being’s offer?
No matter, the answer that the players, give, the door will let them in. Those who answer that they won’t will be given the benefits of Bless spell for 24 hours.
Once they are let in:
Light and warmth fills the very large room which fills the whole space within. Torches adorn the walls. You can smell spices and bread.
The walls and ceiling are a mixture of stone and cloud. About eight people are praying quietly in this temple.
If they have been noticed, Xolbi will be waiting to welcome the characters. Otherwise, when they enter, the priest will greet them and an acolyte will be sent to fetch Xolbi.
Xolbi 2
A tall, slender figure stands before you, with a friendly smile and arms out, welcoming. They have sharp cheekbones, a thick jaw, with cropped hair and is wearing lavish colourful robes.
Xolbi will welcome them in, and offer rest, food, and shelter to the characters.
Xolbi knows information about how to get to Mount Celestia. However, they will want to get an item back that was stole from him a few years ago.
The item is the ancient crown of Rehani that had been recovered from the old tomb a very long time ago. This crown will boost a character’s Charisma by 2 up to a maximum of 20.
They know that it’s been taken by a Drow thief who is now in Denaura, taking advantage of the recent chaos to try to sell it recently. They know that the item is hidden in a cache, hidden in an old magician’s vault in the warehouse district, around Ironwood Street. They show the characters a small glyph which the thief uses.
Once the characters have returned the crown to Xolbi, Xolbi will point the characters to travel to the top of Mount Denau during the next full moon (the following evening) at midnight. It’s there that they can find how to get to Lunia, the first layer of Mount Celestia. Xolbi will also help the characters by keeping the weather calm until they get there.
When the characters depart, Xolbi will say “I wish goodwill on you and to those who you may meet on your journey.”
Denau Mountains
Chapter
Mount Denau Peak 2
The path winds further up the mountain towards the peak.
On the way up the peak, the characters will be given the option to save a lost monk. The lost monk is a Deva in disguise.
The wind howls at the top of the peak but the sky is clear. At night, the moon can be seen rising up. Once it’s at its peak, the wind will calm and a summers warmth will fill the characters. A silver pool will appear, and the monk that they met on the way up the mountain along with it. After he appears, large white wings sprout from his back and armour and a large swords appear. If they did not save him, he will try to prevent the characters from reaching the pool, otherwise he will let them past.
The silvery pool is opaque but if the players are well footed, they can put their heads through. On the other side, the characters can see that the portal is 20ft in the air above a silvery sea. If they look around they can see a few small boats. To the north, they can see land.
The air feels summery the sea is calm.
The session ends when the players jump in.
Travelling Around Lunia 2
Most of the safest paths require travelling up the mountain, to meet another path that goes down the mountain which is time consuming and exhausting.
While Lunia is generally a safe place, off the paths the players may encounter creatures who are trying to get into Lunia.
Various travelling descriptions:
-
The road uphill is tiring. Few people pass you on the way down, but you overtake many on the way up.
-
A few people stop and ask if you need help or assistance on the journey and help point you in the right direction.
-
You pass a large selection of shrines to all the god of good.
-
Back down the hill, you travel through a village.
-
The ashen trees sway in the breeze on either side of you. The beauty from this vantage point is breathtaking.
Safer route encounters 2
If the party choose to follow an safe route, along the paths, across the terrain, roll a d8 every 6 hours of travel: on a 1-3, choose the event with the number rolled below.
Band of Hound Archon Soldiers 2
From the distance, you see a band of Hound Archons orderly marching towards you.
As they approach the players, a few of the soldiers will stop and ask for a Mark of Mydaiel from the players. If they don’t have one, they will be asked to be escorted to the Hall of Salutation
Stubborn Priest 2
You reach a bridge over a 20ft wide waterfall which drops down into a pool 50 ft below. A human, dressed in robes, holding a symbol of Ilmater stands in your way and shouts:
“Travellers, you may not pass over this bridge unless you are worthy.”
A human priest, Nol, he will not let them over unless he be believes are good or lawful enough. He is a commoner. He will not stop them if they try to climb across the edge of the bridge, or if they try to wade through the water.
On a successful DC 17 Strength check, a character can wade through the river. On a failure, they will be swept away, and down over the waterfall, taking 5d6 bludgeoning damage.
On a successful DC 15 Dexterity check, a character can climb across the edge of the bridge. On a failure, they will fall into the water and need to make a DC 17 Strength save or fall over the edge and take 5d6 bludgeoning damage.
An alternative away around will add another 4 hours of journey.
Invisible Stalker 2
This is an attack from an Invisible Stalker sent by Morcanloth, if she knows who the players are. If he doesn’t, then ignore this encounter.
A sharp wind blows across the tops of the trees to your right in a line. It’s quiet otherwise.
Pick a random player to be attacked first by an Invisible Stalker.
Unsafe route encounters 2
The unsafe routes will take the characters through forests and along steep mountain passes.
If the party choose to follow an unsafe route, across the terrain, roll a d8 for every 6 hours: on a 1-4, choose the event with the number rolled below. If you have rolled it already before, nothing happens.
Various travelling descriptions:
-
You walk through a deep forest, the trees ashen, the light from the stars light your path.
-
You pass an dwarf who helps you for a short while in the right direction.
-
You pass a shrine to Eldath at the base of a waterfall. A few pilgrims are here.
-
You carefully walk along a mountain cliff path.
Corrupted lantern 2
Deep pass and a corrupted lantern:
You’re on a narrow path, about 10 foot wide, hugging along the side of a cliff, dropping down 30ft to the right. The path is unstable on the right and doesn’t hold you well.
A slow red pulsating light is in the distance, darting around sharply and randomly.
Approaching the red light:
As you get closer the light stops. It looks like an Archon Lantern. It holds still for a moment before flying towards you.
Roll initiative. This has the stats of an Archon Lantern.
Mauled body 2
You’re deep in the woods, You find a mauled body of a male elf, scratched and bruised. It doesn’t look like it’s been around for long, blood still pouring around it.
A Nycanloth will try to attack the players stealthily. A perception check of DC 14 will reveal the Nycanloth.
Trapped Lantern Archon 2
Surrounded by the ashen trees you see a cave, deep and dark. You can smell a dampness and must, something you’ve not smelt since you’ve arrived in Lunia.
The entrance is trapped with a falling net, a successful DC 17 Wisdom (Perception) will allow a character to spot the trap. A successful DC 15 Dexterity check using thieves’ tools breaks the trip wire harmlessly. Without thieves’ tools, it is done at a disadvantage with an edged weapon or tool. On a failed check, the trap triggers.
When the trap is triggered, the net is released, covering a 10-foot square area. Those in the area are trapped under the net and Restrained, and those that fail a DC 14 Strength saving throw are also knocked Prone. A creature can use its action to make a DC 14 Strength check, freeing itself or another creature within its reach on a success. The net has AC 10 and 20 Hit Points. Dealing 5 slashing damage to the net destroys a 5-foot-square section of it, freeing any creature in that section.
If here with Briglin, she will encourage the characters inside the cave while she waits outside. If they become trapped, she will use this opportunity to attack them. If they’re not here with Briglin, she will arrive a minute after the trap is set off.
Inside the tunnel:
The entrance of the cave is a 15ft tunnel, leading into a wider room. It is dark apart from a flickering shining light at the end of the tunnel. Water drips down the walls. You hear a musical crying in the distance.
At the end of the tunnel:
The tunnel opens out into a darker room, 15ft square. In the centre of the room is a small pile of treasure, on the top of which is a lantern. The lantern is roughly made of a dark metal decorated with evil demonic faces faces on each of the top corners, each staring out. Inside the lantern is a Lantern Archon, faded and pale, crying.
The Lantern Archon, Zuriel, is trapped in this lantern. The lantern can be opened by anybody.
The characters will find:
- 150gp
- 100sp
- 500cp
- a small golden statue of Lathander, worth 200gp
Skree slope 2
You reach a fork in the narrow path you’re following. Straight ahead, the path has loose rock strewn around, you hear some rocks falling and scraping in the distance. To the left, you see a path that goes up the mountain with more even footing far in the distance.
Going up the mountain will add another 2 hours to the journey. Going along the scree, the players must make a DC 12 dexterity check or take 2d6 bludgeoning damage.
Denaura
Chapter
Denaura is a prosperous ancient city which has survived thousands of years of change.
Nobles 2
Morcant 2
The Princes of Denau
Telnetar 2
The family of Telnetar were some of the earlier supporters of the Morcant’s and have maintained a very close relationship with the crown. They were a rich merchant family, focussing on rich foods and drinks.
The leader of the Telnetar, Meneri Telnetar is currently controlled by Qa’lir.
Farnit 2
The family of Farnit own multiple mines, ranging from economic metals to precious metals and stones.
Pertana 2
The family of Perthana own a large amount of the land.
Approaching Denaura 2
You’re following the road south towards the city, through the forest in the foothills of the mountain. The ground is icy and a thin layer of snow covers the road. Most of the trees are bare.
The forest clears after a few miles, showing the bare foothills surrounding the City of Denaura which is a few miles away. Though most of the city is hidden from you by the surrounding valley, you can see the familiar sight of the scarred city walls and a few of the taller buildings that are in the lower parts of the city. The city gate is open but only a few people are passing in and out of it. Smoke rises from some of the chimneys of the homesteads but their farms are quiet. A few look to be entirely abandoned.
Nestled in a steep valley is a small city: the valley’s impassable natural walls overshadowing the stone-crafted ones. There’s a castle burrowed into the top reaches where the surrounding mountains draw closest. A single gatehouse guards the walls that span the bottom of the steep valley.
City gates 2
As you approach the city, you can see that the walls scarred and worn, some newer stonework replaces sections.
A steady flow of people are passing in and out of the gates. A couple of bored looking guards standing on either side, almost ignoring the small rabble.
Anyone who wants to know the history of the city and makes a successful DC 15 Intelligence (History) check knows that it’s an
The guards give the characters no trouble entering the city.
Entering the gates 2
You’ve passed through the city gates. A busy main street climbs up. Behind the stone houses that are set against the mountainside, you can see the tops of the castle’s towers.
The street, leading to the city’s square, is lined with an assortment of busy market stalls. Farmers and merchants are bartering. A procession of robed figures part the crowd, walking away from you towards the centre of the city. Guards wander, chatting with merchants, watching the stalls.
Here the characters have a whole range of options for finding out where the tomb is:
- merchants will point the characters towards March, the bar–keep at The Dragon’s Claw which is ‘just up the road — the bar–keep there talks about mad things like this’, if they’re convinced by the characters
- guards will point the characters towards the scholar, Ret, who works in the castle library, if they’re convinced by the characters
- priests will welcome the characters to join their procession to the Temple of Ilmater where the scholarly acolytes might know of such a place
- general populace will be relatively helpful, pointing the characters straight to March The Dragon’s Claw
Temple of Ilmater 2
In the centre of the city’s square, there’s a large round building. Outside, there’s a statue of a bound man on his knees weeping. The figure is scarred and his limbs are at unsettling angles. On it, in common, is inscribed:
We welcome all to the house of Ilmater.
At the temple, the characters will be encouraged by a greeter, who will introduce themselves as Wurcon, to pray.
The temple has a scholar that knows of the local tombs. Wurcon will take the characters to the her in the “records” room further in the temple.
Wurcon pushes a small door open that takes you into a small room small room, only a few feet wide, lit by candles. The room has a few bookcases in it, with scrolls and tomes on their shelves.
Despite you entering the room rather loudly, a young woman who is hunched at the desk, has not looked up from the scroll she was reading. Next to her is a discarded plate of bread and cheese.
“Glanna. Glanna? Glanna! Hey! We have some travellers looking for some information about a nearby Tomb and I was hoping you could help them.”
It seems to take her a little to return to the world from the text, and she still glances back to it.
The scholar will help the characters but won’t do it gladly. She will be sharp with them and not really going too much out of her way to give them information.
The scholar, sighing, will find a map and will point the characters to the correct place on a map. She knows a little of the history of the tombs.
This is to the Tomb of the Last Rehani where the old Kings are buried — this is from before our current rulers, the Morcant family came here. Unfortunately — we those who worship Ilmater (the God of Endurance) — we’re not that good at keeping detailed records of history.
From my study of our small collection of histories, I can tell you that their rule was tumultuous. There were different powers at play within the city leaders. I think that lead to their declining power and, ultimately, to the marriage of their daughter with the Morcant family.
I’m sorry I can’t be any more helpful with the details here.
You’re welcome to read through the books on history that we have here but I don’t think you’ll find much more than I’ve given you. If you do choose to do so, I’d prefer for you to go elsewhere so as not to cause any more distraction to me.
The Dragon’s Claw 2
Fighting away the cold, a roaring fire crackles. The funk of pipe weed smoke and stale beer linger. There are a few people sitting around the inn: a small group of younger men are playing dice, a hooded figure watching the door from an alcove, a woman hunched at the bar.
Behind the bar a balding man with silver hair is cleaning tankards.
At the inn, the bar–keep, March, will very gladly welcome the characters to sit at the almost–empty bar and to have a drink. He will gladly tell mildly accurate stories about a nearby tomb.
I don’t know of the Tomb of the Last Rehani but there is an old tomb outside the city. The old Lords of this city are buried there.
Ooooohhh, there’s lots of rumours about this place. Some people say it’s haunted by a ghost sworn to protect it. Others say that the dead themselves walk the halls. I know that a scholar from the castle library went there recently never to return.
I doubt it’s the dead that got her, though. Much more likely that it’s the goblins that use the place as a hide–out. I know that’s not a rumour! They don’t really cause a problem to the people in the city so the Lord here hasn’t done anything about them.
He continues to ramble about the troubles that the goblins cause to the farmers.
Upper city 2
As your tiring journey takes you higher up the city, closer to the castle, the buildings become closer together, making the city narrower. Closest to the castle, the path follows the side of one of the valley walls with large mansions on the other side.
The Castle 2
Castle wall 2
The castle’s wall is guarded by eight guards.
Eventually, you pass the last building and ahead of you are the walls to the castle. These walls stretch across the valley from one side to another, though that space is now only 50 ft.
Behind the walls you can see a stone castle with two towers at the front. Layers continue behind it, each one building on the mountain’s incline.
The path takes you to the centre of this wall to a gatehouse. There are 4 guards standing at this entrance, barring your way. More stand on the wall.
The guards will only allow the players to pass under the condition of being accompanied by a guard if:
- The characters can show a right of passage document signed by a Lord or Lady.
- The guards are bribed for 8gp per character.
- The characters succeed at a DC 20 Charisma check.
Castle courtyard 2
Through the gate is a courtyard and gardens, the castle about 60ft away from you. In the centre is a fountain, although there’s no water flowing.
Here, you can only see the front of the castle, a round tower built up against the walls of the mountain. Large carved wooden doors are closed at the front, a guard standing on either side.
There’s almost a direct path along the middle towards the wooden doors. A path runs to the right, following the valley’s wall, to a smaller side entrance with little ornamentation.
Servants’ corridor 2
The stone corridor is narrow. Plain doors
Path to the secret entrance 2
This cave entrance can be seen with a telescope or similar object from distance.
The characters will have to find a way to get up to the cave entrance which is 150ft up the cliff or 50ft across the cliff.
If they have the appropriate gear, they will be able to do it without any checks.
Cave entrance 2
The cave is damp and slippery. It looks like it’s been hewn from the rock. There is no light and the you can’t see the end.
At the end of the passage, the characters can see it open out into the bridge across the chasm.
Bridge across the chasm 2
From earlier in the passage, you could have mistakenly think this opened into a room. It is, however, a huge chasm. On both your side and the other side there’s a balcony about 50 feet across, with balustrades on the sides. Across the middle is a bridge that’s 10 feet across and about 40 feet long. The bridge doesn’t have any railing.
To the left and right of the bridge on both balconies, statues look ahead with swords held out.
At the far end is a door, in front of which is a small obelisk.
The statues will wake (Animated Armour) unless the characters bow to them. If the characters bow to them after they wake, they will return to their guarding positions.
When the players reach the obelisk:
The obelisk has a small rounded indent at the top.
The key (the small orb) must be placed on the top of the obelisk for the door to open. The characters will hear a click when they put it on top of the obelisk.
Behind the door is a spiral staircase that leads upwards.
Up to the castle 2
A spiral staircase takes the characters upwards. When the reach the top of the spiral staircase, they will reach a wall with a lever. The wall will have small eye holes that the characters can see through which they will see by the light coming out of them. They will be able to hear a man weeping.
The characters will be able to see through the holes in the wall a throne room, with torches on the wall. A man is on a throne, weeping.
Pulling the lever will cause the wall to slide open, causing a loud scraping sound.
This wall will reveal the throne room.
The throne room 2
The throne room is set up for dining, full of tables and chairs. There is nobody else in the room apart from the weeping man. At the far end of the room is a set of double doors.
The scraping noise of the wall opening will cause the man to jump up in surprise. He will shout “You shouldn’t be here. Leave! Run!”
The moment he shouts that, you hear a loud crack and a cloaked figure appears, pushing the man back into his throne. She has a chiseled face is obsidian with dark blue streaks and she has white hair. She has a symbol of a sun emblazoned on her cloak with a dagger in front of it.
The figure laughs and with an elvish accent says, “Shut up old man.”
"Now, now, this is a surprise. I heard you were in the city, Elmon, Meriele, and Aseir. Rumours of your destruction in the city over the last few days have reached my ears. I wasn’t expecting to find you right in here, though!
“Let me introduce myself, I am Qa’lir OlinarElydir.” She bows. "I am glad to be finally meeting you. You see, I am in great debt to you, it’s through your actions that I can be here today.
“Please! Sit! I’ll call the servants in and they can bring us some food.”
If the characters don’t sit, she will start walking towards them the torches in the room will flicker, she will raise her hand towards them and shout “I will enjoy destroying you. Hahahahahaha!”
If the characters do sit:
She claps and two wights come in through the doors at the end of the throne room.
“It’s my honour to represent Elydir in this city. She sent me here to take the city. The destruction that I’ve been able to cause.”
She smirks and laughs.
"With you here now, I would like to make you an offer. I’ve seen what havoc you can wreak.
“Join me, swear allegiance to Elydir. We can cause so much devastation.”
If the players refuse to join her, she will cast cloudkill on where the players are and misty step away.
The Castle Library 2
The large room is filled with books and scrolls. Every accessible inch of the room is taken up by shelves with the narrowest of spaces between them.
A man dressed in robes is moving books to what somebody might call a desk, although it could just be more storage.
He happily gasps as you walk in, smiling.
Info about Elydir’s history and nearby elven village, Aymeluma, from the symbol that they show the. The symbol that he knows of doesn’t include the chain.
Things that the castle librarian knows:
- Aymeluma is lead by the Glynlamin family.
- The location of the village, on the other side of the mountains. The options to get there: the mountain pass that gets there, which should take less than a day; or the roads around the mountains that would take a week instead.
- There’s an ancient connection between the city and the elven village. The eldest son of King Rehani was meant to marry an elf from there but that was before the Morcant family took over rule from the Rehani.
He will explain to the players about the tomb’s location and how to get there, although that they don’t know much about it now — the mad King Bleiduid Morcant a few generations ago demanded the burning of anything about the Rehanis. He will explain that one of his apprentices went there a few weeks ago but never returned, which he sounds very sad about. He will ask them to see if they can find this apprentice.
Ironwood Street hideout 2
Ironwood Street is a small back-ally of a much larger road in the city.
A symbol shown to the players by Xolbi can be found here, and it marks the location of the hideout. This can be found using a DC 16 perception check, or by using thieves cant.
The entrance to the hideout is a small door which is locked that requires a DC 18 check to unlock it, or a DC 15 Strength check.
This opens out into a small, 15ft by 20ft room. The room has a table, and a chair and the floor is covered in straw. At the other end of the room is a staircase that leads down, torches on the walls.
A cloaked man stands in the room with a knife out, liquid glistens on the blade.
This man is an assassin who will defend the stairwell.
This door leads into a brightly lit room. The room is rectangular and is 20 ft on the side you just entered on, and 30ft long. Along the walls are sconces filled with flame.
There are two podiums in the room, one 5ft away from you, the other 5ft away from the other wall. The closest podium has a glass orb on it.
At the other end of the room, there is a stone doorway but no handle or keyhole.
There’s a door at the other end of the room which will be opened if the orb is moved from one podium to the other.
When the orb is removed, the characters must succeed on a DC 22 Dexterity saving throw or else be thrown to a random place in the room. The person holding the orb must succeed on a DC 12 Dexterity saving throw or else drop and smash the orb.
In the room behind the door, there’s 200gp, an antique carved wood plate, inlaid with bone (40gp), a sturdy alabaster figurine of a tower, set with a chalcedony (80gp), and a durable adamantine bowl, inlaid with platinum (500gp). On top of the pile is a simple golden crown, which is the Rehani crown.
City of Denaura 2
Journey to Denaura 2
Approaching the city 2
There are eight guards at gate, two on each side, four standing in a line across the middle. When the characters reach the gate, the guard closest to the middle on the right will ask the characters to halt and as what their intentions in the city are.
If the guards think the characters are suspicious, they will let them in the city but report them to Qa’lir.
The main street 2
Where the main street was previously busy and full of life, only a few stalls remain staffed. Sitting in the alleyways and streets are beggars.
The beggar outside the Dragon’s Claw 2
The beggar, as the characters pass the Dragon’s Claw, will say “If you Elmon, a little help for an old friend.” It will require a DC 18 Intelligence (Investigation) roll for him to recognise it’s the librarian from the castle. In any case, in exchange for food and drink, he will promise the characters some information if they will speak in a private place. If the characters ignore the beggar, he will seek them if they enter the Dragon’s Claw, claiming to the barman that he’s returning an item to the characters that they dropped outside.
In the private place, he will help the will give the characters some information about the deposition of the old King Morcant where the Lord and his daughter escaped.
The Dragon’s Claw 2
The mood in the dragons claw is a lot less friendly than the last time.
The barkeep will be happy to serve them. He will try very hard to sell them on accommodation for the night that would normally be considered comfortable.
The characters may hear about a recent announcement that a clerk from the Temple of Ilmater is going to be executed in the morning of the next day.
The Temple of Ilmater 2
A few guards will be in the Temple of Ilmater, arguing with a senior priest that the characters will recognise as Wurcon.
“She is a member of the Ilmateri, you have no right to arrest her as no other Lord has before,” shouts Wurcon.
“Do not blame us for her arrest old man,” one of the guards says, “the order came direct from Lord Telnetar and it was his own guards that captured her. We are only under orders to prepare for her execution.”
As Wurcon steps forward angrily, “You must-.” The silent guard pushes him to the ground and says, “Do not threaten us, there is nothing we can do.”
Wurcon, if helped by the characters, will take the characters to a side room to explain the recent events regarding their clerk, Glanna. He will know that Glanna left, saying that she had some temple business at the Telnetar mansion, though he now thinks that she was up to something.
Farnit’s mansion 2
If the characters go to Farnit’s mansion, they will be informed by servants that their master is not around. The servant will know where Farnit is but is reluctant to reveal that information.
Pertana’s mansion 2
If the characters go to Pertana’s mansion, they will find both Farnit and Pertana “discussing business” in the study. The servants will be reluctant to let them see the nobles.
The rooms in the mansion are well decorated and it’s clear that Pertana is rich.
Farnit and Pertana will be shocked to be interrupted, will try to hide all of the documents that they have out, draw weapons and will berate their servants for interrupting them. They won’t attack straight away but Pertana will begrudgingly ask the players, “What business is so important that you must interrupt our private meeting?”
The study is large with books and parchment on large book cases on the wall. Wood panelling surrounds the room and it is ornately decorated. A fire crackles in the large fireplace.
A portly middle-aged gentleman is looking over parchment and books at the desk. An woman is seated, reading out a passage from a book intently, “… and the Vanquisher, Faurin, took his own life…”
Hearing you enter the woman throws the book to the ground and quickly draws a short sword. The man throws his cloak over the contents of the table. The woman shouts, “What is the meaning of this interruption! Servants! You were ordered to prevent anybody from entering my study.”
If Farnit and Pertana think that the players might be useful or friendly, given their notoriety, Pertana will give them the following information:
"I only impart this knowledge because we, the Watchers, are desperate. We are not generals or warriors, just traders and scholars from a prosperous city. We have not fought in hundreds of years and we wouldn’t even know where to start. Many are calling Farnit and I apathetic towards the circumstances we face.
"We are not, however, apathetic. We are fighting in our own way. Mostly we gather information hoping to find some way of ending the tyranny of Telnetar. While we have not found anything that Farnit and I can do, I now think there is something the three of you can do.
"The day after Telnetar attacked the castle, a guarded carriage went from the castle to his mansion in the dead of night. The guards went into his mansion and fighting could be heard there. We saw the guards dragging some people out, into the carriages. The carriage didn’t go back to the castle but instead to one of Telnetar’s warehouses.
"The day before last, Glanna (who I think you have met before) insisted that the best thing to do was to find out what happened in the mansion, as clearly something notable happened that night. However, she’s not returned and we have heard news that she will be executed.
"I fear that we, Farnit and I, have been revealed and that we will soon be.
“I implore you to help us find out what happened here. I think it might be key to saving this city. Do whatever you think is best here, whether that is investigating the mansion, saving Glanna, or investing the warehouse.”
Roleplaying Pertana 2
Telnetar’s mansion 2
There’s a small guard presence outside the front gates of the mansion, preventing easy access, these guards are under order from the new Lord to prevent civilians from entering the Lord’s mansion, though they don’t know what’s inside. The guards will react to loud noises inside the manor, worrying that they’ve failed at their job.
Iron fences, 10ft high, with hedges behind them surround the Lord Telnetar’s mansion grounds. The fences are in good condition but the hedges are.
A few servants lucky to survive have barricaded themselves in the noble’s chambers. This chamber contains the key required to open the secret entrance to the castle.
The grand entrance hall 2
What was once clearly a great entrance hall is ruined. Dust, debris and dried blood cover most of the surfaces.
A grand staircase is straight ahead, though the top half of it has collapsed entirely, revealing a stony dark corridor behind a disintegrating wall. Large chunks of the marble banister have fallen into the staircase. A large archway opens from the top of the stairs to the fist floor but the floor has collapsed where the staircase would have ended. Through an arch at the end of the stairs allows you to see into a large light room.
A mangled, rotting body is slumped against the far left wall, a sword abandoned in its chest. Its stench filling the room.
To both the left and the right of the main door are ornate arches. Through the left you can see shattered lounge furniture and through the right a gallery, though the artwork lies scattered and torn on the floor.
On either side of these arches are collapsed suits of armour, apart from to the left off the left door.
From the dark corridor you hear the echoing a woman cry out in pain and a deep raspy laugh.
If the characters approach either of the doors, the armour guarding that door will become animated. These are Animated Armour (see page 19 of the Monster Manual).
If the characters approach the rotting body, the sword in the body will become animated. This is a Flying Sword (see page 20 of the Monster Manual).
If the characters attempt to climb over the rubble, they will need to make a DC 13 Dexterity check or otherwise fall down the rubble and down the stairs.
The drawing room 2
The drawing room has shattered furniture all around. Signs of fighting are here as well. The door to the dining room is ajar and the characters can smell rotting food from there.
There is a secret door, leading to the servants’ passage, disguised as a wall on the right wall of the room.
The dining room 2
The stench of rotting food fills this room, the long dining table is on its side, food all over the floor.
There are two secret doors, both leading to the servants’ passage, disguised as the wall, one on the right side of the room, one on the far side of the room. The secret door at the far side of the room is ajar.
The gallery 2
The paintings are torn, frames shattered; the statues broken. At the end of the room, there’s a barred door which has a couple of broken statues barring it shut. Behind the doors you can hear some scratching and shuffling.
The barred doors lead to the library.
There is a secret door, leading to the servants’ passage, disguised as a wall on the left side of this room.
The library 2
This room, like the others lies in ruin. It was once a library, the book cases are shattered and the books are on the floor.
There are eight zombies in here, they are all wearing servant’s clothing.
There are two secret doors, both leading the servants’ passage, disguised as the wall, one on the left side of the room, one on the far side of the room.
The servants’ passage 2
A narrow stone passage.
Where the collapsed wall and stairs are from the mansion’s entrance hall, there are stairs leading downwards; however, the top step is if you come at the stairs from the other direction.
The passage at the end has a spiral staircase up and three ordinary doors leading to the servants’ quarters. At the top of the spiral staircase, there is immediately a wooden door. From behind it, shuffling noises can be heard.
There are plain doors that match up to the secret doors in the drawing room, the dining room, the gallery, and the library.
The servants’ quarters 2
The beds in this room are scattered, all of the bedding has shredded. There’s no sign of any movement at all.
The kitchen 2
The stench of rotting food also fills this room. The preparation tables are full of half-prepared food. A large cauldron has been knocked over at the far end of the room under a chimney. Ashes cover the floor. Pots and pans are scattered everywhere.
There’s no sign of any movement in this room.
The storeroom 2
A room full of barrels but most of the barrels are empty apart from some stale bread and a few mouldy apples.
The grand corridor 2
A long corridor, wider and ornately decorated. At the far end is a large window. To the left are three doors, the middle and larger one is closed. The others are open. To the right is a large open archway.
In the corridor, four zombies wearing servant’s clothing.
From the spiral staircase, the doors on the left hand side (closest to furthers) lead to the study, master’s bedroom, and dressing room.
The door to the master’s bedroom won’t open if the players try to push it open. When the players do this, a man’s voice from inside will shout “Wake up! They’re trying to get in again!”
The door will take a DC 14 Strength check to open it.
The ballroom 2
A large ballroom with a large wooden ceiling. On each of the walls are two large windows. The broken staircase is at the other end of the room.
In the room are another ten zombies wearing servant’s clothing.
The study 2
The study is another room full of destruction. The desk is smashed and there is paper everywhere.
The dressing room 2
The dressing room is another room full of destruction. There is rich clothes of both lords and ladies scattered around the floor.
The master bedroom 2
This room, slightly larger than the rooms downstairs, also has ruined furniture. A broken four poster bed and chest of drawers are piled directly in front of you, moved out of the way to let you through the door.
A pile of food is against the left wall, in far left corner is a pile of bedding.
To the right of the room there’s a large closed chest.
There are four servants and a boy looking tired and bedraggled, their clothing torn and soiled: two of the servants are closer to you, having moved the furniture; one is sitting on the bedding with the boy, the other is standing in guard of the chest.
The four servants in here managed to hide during the fight and then hid in this room. They hid under the food in the barrels, one of them hid the chest with them when they saw what was happening.
In the chest is:
- a carved ivory statuette
- a silver and gold broach
- a ceremonial electrum dagger with a black pearl in the pomel
- a lute (Doss Lute)
- a dagger (a Dagger of Venom)
- a small carved wooden box with an inscription on it
On the small carved wooden box, the inscription says:
In your oath to me, you have bent your knee. Remember this oath, when using this key.
Inside the box is a small orb wrapped in fabric which has an inked map which shows the castle and its walls and marks a small passage in the cliff outside the castle walls to the south.
The cellar 2
The cellar is dim, lit only by a couple of torches.
At the end of the room are are iron barred prison door, both are open. To the left of the room is a table.
In the centre of the right of the room is a bound woman and gagged woman, she’s sobbing. Standing above her is a man ready to strike her. His skin is very pale ashy taut skin, he wears dark scaly armour.
At the table are two hooded figures.
The man standing next to her is a wight, the two hooded figures are cult fanatics.
Telnetar’s warehouse 2
This is where Telnetar’s family is being held captive.
When alley for the entrance of the warehouse is trapped. If the players trip the wire, they will cause a loud crashing sound that will alert the guards inside. The trip wire is 3 inches off the ground and stretches between the two walls. A DC to spot the wire is 10. A successful DC 15 Dexterity check using thieves’ tools will successfully disable the trap. Trying without thieves’ tools will require a check with a disadvantage. On a failed check the trap triggers.
There are no guards standing outside the warehouse.
Entry room 2
This small room has some tools for moving boxes and barrels and a small table with a couple of chairs.
If the trap wasn’t triggered, two cultists will be in this room, sitting at a table. If the players make enough noise, the warehouse defenders in the first store room will join the fight.
If the trap was triggered, there will be the two cultists plus the warehouse defenders in the first store room.
There’s a door on the opposite side of the room which is barred and locked (DC 17 strength to unlock it). There’s a door to the right that is open if the characters triggered the trap and closed otherwise. If the characters make a lot of noise during the fight and the trap hasn’t been triggered then
Store room: 1 2
This room has various luxury wares, it has a door that leads back to the entry room and another locked door to the left.
This room has two cultists in it and a cultist fanatic. The cultist fanatic has keys to the prisoners’ room (the same key fits both doors).
Store room: 2 2
This store room is filled with large boxes, chests and barrels. There are five cult fanatics waiting to ambush the players.
Prisoners’ room 2
Most of the items have been taken out of this room. There’s a table with a couple of chairs.
In this room there’s a cult fanatic who is guarding the prisoners.
The prisoners are a woman and two girls who are all sitting in one of the corners of the room.
The public execution of Glanna in the city square 2
This will occur on the morning of the second day that the characters are in the city, if the characters haven’t saved Glanna.
Her last words will be “From the scripture of Ilmater, ‘go to the Swift’s old nest to find the way to the new nest.’”
Qa’lir’s interference 2
When Qa’lir becomes aware of the characters, she will try to interfere with them.
Thugs 2
If Qa’lir becomes aware of the characters in the city, she will send eight thugs to threaten them.
The thugs will threaten the characters if they find themselves somewhere more secluded in the city. The thugs will attack the characters if provoked.
We think it’s time you took your business outside the city.
The captain of the thugs will have a letter from the Qa’lir with the instructions. It will only be signed with a symbol with wings and
Assassination 2
If the thugs fail, Qa’lir will send an Invisible Stalker as an assassin. It will be under instruction to kill the characters in a private place, probably their room in an inn or even a safe-house. When the characters enter the
Guards 2
If the assassin fails, Qa’lir will send guards to incarcerate the characters (if their location is known) for treason. These guards will attempt to jail the characters in the
After success 2
- Remaining wights under Qa’lir’s control will wreak havoc. Most of them were stationed with the guards and will have been taken down
- Cultists will flee
- Constructs will continue to fight but will fight the cultists
- Telnetar will leave the castle and city
- Pertana will rule until King Morcant returns
Jairnt
Chapter
Jairnt 2

Small village with a tavern called The Watchers Tavern, the accommodation is modest.
The players may hear about the rumours.
The Watchers 2
Outside the tavern:
The tavern leans against its neighbours, the tiled roof sagging. Warm light spills out of the windows and boisterous chatter emanates, inviting you in from the quiet cold and dark. You can smell wood smoke and charred meat.
Inside the tavern:
The moment you open the door, warm air floods out. The must of tobacco smoke and spices fill the room, combining with the smoke and charred meat. The many merry patrons chatting loudly amongst themselves hardly look over, though one shouts, “Get in! Quickly! You’re letting the warmth out.” A few people keep to the corners, alone and cloaked but little attention is paid to them.
The bar has a few people being served at the bar by a young teen boy.
The bar serves cheap wine, reasonable ale, and cider. Some spiced meats can be served as well.
The Lonely Tower
Chapter
The tower stands tall, around 130ft, it narrows slightly towards the top. There’s no decoration and no windows. The unweathered stone is smooth to touch.
A prison for Elydir, she is bound here until the Dawnsword Amulet is returned to her.
The door faces towards the entrance of the valley and is easy to find.
The door 2
Although the rest of the tower lacks decoration, carved into the stone is the shape of a huge door. Above the door, you can see runes making up 5 words that you do not recognise and cannot read.
Anybody who tries to work out which language it is and makes a successful DC 15 Intelligence (History) check discovers that the language is Carnian, a lost language. If the language can be understood, it reads: ‘Safe we keep her. Allow no will.’ The original intent, however, was: ‘This keeps us safe from her, do not free her.’
To enter, the characters must speak the word unbind or free.
Entering the tower 2
The stones making up the doorway turn to a bright light. The light fades, revealing a short passage into the tower. The passage leads to a brightly lit landing; glass half–bowls filled with flame on the walls. From here, stairs spiral upwards, starting on your right. Apart from this, the landing is empty.
The passage stays open after everybody walks in.
The stairway follows up and around, eventually reaching a landing with a door on the left — facing the centre of the tower.
The lamps are made with Continual Flame.
Reaching the study 2
After you open the door, you see a large circular room before you. The same torches as before light it. Luxurious furniture is sparsely spread around the room, although its style is unlike anything you’ve seen before.
On the left wall, there’s a four–poster bed with a chest sitting at the end, and large wardrobe to the side of the bed. On the opposite side, a huge bookcase is crammed with scrolls and books. In the centre of the room is a large table that’s dressed with food. Closest to you is a desk facing the door. The smell of incense fills the room.
Sitting at the desk is a woman: her hair grey and face wrinkled, pointed ears poke out under a circlet with a ruby gemstone set, and her robes are a deep dark red with intricate symbols laced in a golden thread.
Noticing you arriving, she smiles towards you and stands, gesturing you into the room towards the table.
‘Ah! I’m glad that you decided to join me. Please, come in.’
Here, the woman introduces herself as Elydir. She offers the characters food and drink, and if they accept, food will appear at the table.
She will explain that her quest is to have her stolen amulet retrieved. She’s chosen them because it was taken from her a long time ago and it’s likely to be a perilous journey to retrieve it. The amulet is in the Tomb of the Last Rehani, which is close to the City of Denaura which is a 2 day journey from here, across the moors. She doesn’t know where the tomb is.
She will give the adventurers an very old map and some food supplies for 3 days travel.
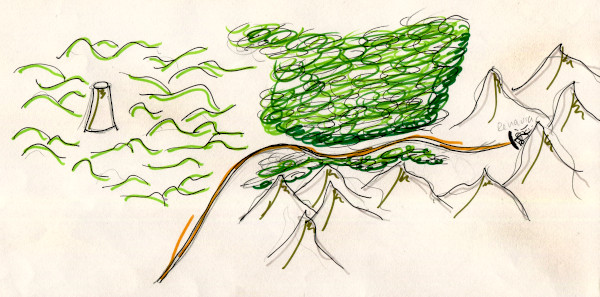
The map shows the tower and the moors with the surrounding area. The tower is in the west and the city in the east. The moors surround the tower for west half of the map. The city is against the mountains in the east. A road comes from the south–east to the centre of the map, following on east to the city. To the south of the road is a small amount of forest before mountains, that continue east of the city. To the north west of the moors and to north of the road is a forest.
Chest 2
Inside the chest:
- Silvanus robes and broach
- 100 gold pieces
Temple of Affinity
Chapter
This is also known as the Temple of the Corrupt Orb. This is where the Ith has been kept safe from the world, and the world safe from Ith. Inside the temple, the Orb can detect the thoughts and feelings of any creature. Additionally, it can speak to any creature telepathically.
The temple is Hallowed cast at 8th level, excluding Celestials from the standard effects. The spell also has the additional effect, all humanoids in the area cannot be frightened.
You find the hidden passage that Faurin told you about. It leads you into a deep gorge, though the stream has ran dry. The passage winds back and forth until you reach an opening. The gorge widens and you see the stars above. Ahead, a temple, its stone worn, built across the gorge. Pillars decorate the front. The forest is creeping down into the gorge but it has left the temple untouched.
Above the door, celestial script is engraved.
The celestial script says “Speak the Password to Free the Orb”.
The Temple Entrance 2
The door opens. Inside, there’s a small room, only 15ft wide and 10ft along. The walls are cracked and the floor dusty. In the quiet, the air rings a continuous high pitched. Ahead of you are two doors, both closed.
On the wall across the room, text is engraved on the wall. Though you don’t recognise the script but each of the players hears a voice speak:
Beware, those who enter here, Of what you seek. We know not if it is evil, Or strong or weak. It hears your thoughts and feeling, As if you speak.
As the players what their characters are currently feeling as their primary emotion. The Orb will introduce itself to the players at this point, speaking to the players directly by the emotions that they’re feeling. It will apologise for intruding on their thoughts. It will warn them that their friendship will be tested if they continue with three challenges ahead.
Challenge 1 2
After a chance to speak. Ith will give the characters a choice.
Either dexter or sinister, a fight you will meet. The sinister, arduous but rewarded. The dexter, easy and untiring.
When you’re ready, each of you think your choice don’t say it, and I will open the door that you choose, though, it doesn’t have to be unanimous.
C1.1: Option 1 2
In this room, there are 4 animated armour and 3 flying swords.
C1.2: Option 2 2
In this room, there is a shield guardian. After the fight 3 healing potions will appear.
Challenge 2 2
Ith will give the option as below but it will do the opposite of what the characters voted for.
To the left, there’s a fight. To the right, a puzzle with a risk but reward.
C2.1: Option 1 (Left) 2
In this room, there’s an earth elemental.
C2.2: Option 2 (Right) 2
A puzzle, with only one chance.
   _____________________________
  /         |         |         \
  |  .      |  x      | x       |
  |    > .  |    > x  |   > . x |
  |  .      |  .      | x       |
  \_________|_________|_________/
       |                   |
       |  x x .            |
       |         >   x . x |
       |  . x .            |
       \___________________/
      _______________________
     /                       \
     | x . . .               |
     |           >  - - - -  |
     | x . x .               |
     \_______________________/

     O           O           O
 ____|____   ____|____   ____|____
/         \ /         \ /         \
| . x . . | | . . x x | | . x x . |
\_________/ \_________/ \_________/
On a failure, a shield guardian will appear from a door on the right. On a success, 3 greater healing potions from a door on the left.
Challenge 3 2
It will offer the choice between the following but only divulge certain information and will lie to the players:
-
The room on the left is an harder fight.
-
The room on the right has a fight.
-
The room on the right has a reward.
He will then pick a player at random and say that to another that this player is lying.
C3.1: Option 1 (Left) 2
- 1x Helmed Horror
- 2x Animated Armour
C3.2: Option 2 (Right) 2
- 1x Helmed Horror
Temple Nexus 2
The door opens into a much larger room, dust covers the floor. In the centre of the room, at the top of a stepped pyramid, a statue stands a reddish orb at its heart.
If the players have worked in unity and are in unity at this point, the orb will leave its housing.
If the players haven’t worked in unity or are not working in unity at this point, it will fight them.
It is a Shield Guardian with a bonus of +9 to hit instead because of its ability to read thoughts. It will try to stay at the top of the pyramid and will push them down.
The Haunt of the Lonely Dagger
Chapter
The Haunt of the Lonely Dagger 2
This is a very large castle. Its walls guarded by goblins, orcs, and ogres.
The Ice Portal
Chapter
Tomb of the Last Rehani
Chapter
Tomb of the Last Rehani 2
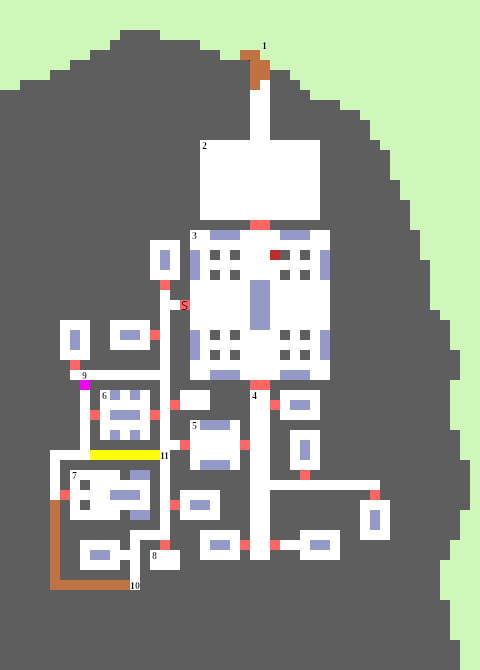
Travelling to the Tomb 2
When they reach the path, read out the following description.
The old road was not easy to find — the forest reclaiming it. Plants climb over crumbling sentinels, guarding each side of the road. Plant litter covers the floor and bushes and trees grow from the cracks in the stone.
A successful DC 16 Wisdom check will allow a character to see goblin tracks heading along the path.
For about an hour, the path continues overgrown, getting steeper. It ends where the mountain rises, a collapsed door in front of you.
1. Entrance to the tomb 2
At the foot of the mountain is the collapsed door.
There’s a gap large enough for small creatures at the bottom, or medium creatures with a successful Dexterity check of 15.
Some of the rubble can be shifted instead, with a successful Strength check of 15 but it will cause some of the remaining rubble to collapse and the goblins to be prepared
The rubble can also be climbed over with a successful Strength check of 15.
2. Goblin hideout 2
As you enter the corridor, the first thing that hits you is the stench of goblins. Fragments of the walls and ceilings lie on the floor. Further down the corridor, there’s a small amount of light.
If the goblins know the characters are coming, then the corridor is silent; otherwise, laughter and arguing can be heard.
You can see a chamber ahead. At the opposite end of the chamber there’s a set of double stone doors. In the room there’s crude tables and chairs. A primitive wooden barricades is a couple of feet into the room.
If the goblins heard the characters coming, then the tables are empty (but torches are lit), the goblins hiding behind the barricade and walls; otherwise, goblins are at the tables and chairs, playing cards.
After combat is finished:
Above the door is text that the players cannot understand. There are six orbs, three on each side of the door. Above the door are six lines, each with a dot at the end.
.          .
 \   -.   /    \     /   .-
                .   .
The orbs must be pressed in the right order. Pressing the wrong one resets it but the player who presses the orb, gets thrown back from the wall by 10 feet, taking 1d4 damage.
3. Tomb of King Lunit Rehani 2
Coming through the main doors, an expansive vaulted room is before you. It’s about 120ft long. In the centre of the room a large sarcophagus is built onto a stone platform with steps running up to it. A blue crystalline stone outcrop is right above the sarcophagus, casting weird flickering light from the torches around the room.
Between the centre and each corner are 4 pillars. Each of these 4 pillars intertwine to build up to the vaulted ceiling.
There is a large engraving on the ground in front of you.
Collapsed at one of the pillars is a slashed and bloodied body wearing robes. A backpack lies on the floor before the engraving, its contents strewn.
After two minutes in the room, the stone above the centre of the room flashes a bright blue. Nothing happens for a couple of seconds until the characters can hear the scraping of stone. The sarcophagus lids are sliding open. Skeletons begin to climb out. There are 11 skeletons.
The large engraving shows a simple carved map with each of the rooms labelled; the engravings are in Carnian.

The backpack (and the area around the backpack) contains the following supplies:
- a hammer
- 10 pitons
- 10 torches
- a tinderbox
- 10 days of rations
- a waterskin
- 50ft of hempen rope
- a partially translated copy of the engraving showing:
- the “Lord’s Tomb”
- the “Lord’s guard tomb”
- a storage room
- “The Tomb of the Vanquisher” — the writing seems to have been interrupted.

4. Grand corridor 2
There’s grand corridor carved out of the stone. Torches of a similar design from Elydir’s tower adorn the walls, fire flickering out of them. The corridor is about 200ft long and about 10ft wide. You can see 3 corridors off the left hand wall and 2 off the right hand wall — these are built at odd intervals. The space in here is almost pristine, apart from dust. The grand doors that are at the end of the corridor are open.
The smaller corridors as the characters go along:
- a corridor on the right, it’s about 70ft long.
- a corridor on the left, it’s about 90ft long.
- a short corridor on the right, and then a door
- a short corridor on the left, and then a door
- a short corridor on the right, and then a door
5. 4The Lord’s guard room 2
If the players try to go through this room, 6 skeletons will leave their sarcophagi to attack the players almost immediately.
Giant spider’s chamber 2
Door is stiff to open.
Room full of spider webs, some light filters down from a hole in the ceiling, sarcophagi are closed.
When the players enter, the skeletons will try to get out of their sarcophagi — 3 successfully will do so, the characters can hear the other skeletons scraping to get out.
After about 18 seconds, a giant spider will come to investigate.
The spider and skeletons may attack each other.
Tomb of the Vanquisher 2
Raised sarcophagus in the middle of the room. Arch across the middle of the room. Can see some more sarcophagi past the arch.
Players will feel a sense of uneasy sadness and unfulfillment as they walk into the room. The room feels a lot colder as well.
The players will recognise the text as the same that’s on the stone engraving, and now on their map:
Faurin, Vanquisher of Elydir
If the players open the sarcophagus, they will find a skeleton with an amulet. If they take the amulet, the door will slam shut. A pale white figure will appear between the door and the players.
‘That amulet must stay here,’ it says sorrowfully. ‘I cannot let you leave with it or knowledge of it. I’m sorry. I’m sorry.’
After saying that to the players, it will start to move towards them with its sword out. If the players attack, the skeletons will join Faurin, although the ghost will step out of the fight at the start.
The ghost, gone mad with time, is only focussed on preventing it from ever getting to Elydir and it will be very difficult to reason with it. If the players mention being sent or who they were sent by, the ghost will become violent and impossible to deal with.
The ghost will not be convinced to let the players leave with the amulet and it can only be taken by force.
STORAGE 2
Room large enough to have a short rest in. Has a chest containing mostly rotted/decayed belongings that have turned to dust. There’s 50gp and 2 gems each worth 50gp each.
The door can be shut and barred if the players wish to rest.
Locked door 2
This locked door requires a DC 22 Dexterity check to unlock it.
Collapsed passageway 2
The corridor has completely collapsed, rubble blocking it entirely.
Hidden doorway 2
A successful Perception (Wisdom) check of 20 DC will uncover a door.
* Additional Tombs 2
Each contains 3 skeletons that will attack the players almost immediately. In each of the tombs, the players will find 3d10 gold.
Characters
Appendix A
This includes information about the major characters in this campaign.
Elydir 2
Spell list 2
- Scrying
- Dream
- Project Image
Faurin 2
Faurin was a half-elf sworn to the Denauran Scholars - a school devoted to the Rehani. He was Elydir’s closest friend and lover. While he generally supported Elydir’s vision of the future, he disagreed with the destruction she caused trying to achieve it. His ghost inhabits the Tomb of the Last Rehani but if freed his soul will travel to Mount Celestia.
In ghostly form, his grey thinning hair is scrapped back off his narrow haggard face. His eyes are bloodshot and tears permanently wet his cheeks. He wears simple woollen robes. He appears much healthier and a little younger if he is freed to Mount Celestia - his hair thicker and his eyes are no longer bloodshot. He is generally melancholic but, in his rare smiles, his face softens and shines sincerity and warmth.
Faurin’s promise. Prince Bainot Rehani, brother of the murdered King Lainot Rehani, convinced Faurin to kill the Elydir. However, in his love of her he instead imprisoned her in a powerfully warded tower, taking her amulet as proof of killing her. In hope that he may eventually be able to save Elydir by stripping her of her powers, the warded tower would only allow her to leave if the amulet was returned and the tower’s doorway reopened.
Lost hope. Faurin returned to the prince with the amulet, his victory celebrated. He spent the rest of his life in high regard with the lord. He spent much time working in secret to find a way to free Elydir but to no avail but over time, he became a frustrated and bitter man, killing himself in a deep depression. Still celebrated, he was buried with the family in the Tomb of the Last Rehani, the amulet buried with him. Despite his wish to leave the world, Faurin’s knowledge that there is no hope of stopping Elydir if bound him to the amulet as a protector. If freed, his soul will travel to Mount Celestia.
Faurin’s Traits 2
Ideal: Knowledge. Through knowledge the world can be bettered.
Bond: No matter the wrong that Elydir has done, I love her.
Flaw: Though I will help others fight against Elydir, I will not let them kill her.
Banir Any-kin (Morcanloth) 2
An Arcanaloth in disguised as a fair elf, Banir Any-kin, using the Alter Self spell. In his pack are dark tomes, spell scrolls, and dark arcane components.
He seeks knowledge and believes that it will lead him to power and self agency. During his travels, he has been in search of the Lost Book of Keeping that contains his name. When he sees something that is magical or full of knowledge, he can’t think of anything else other than how to get it.
He has taken a long and difficult journey to Lunia to find [Ith, the Orb of Empathy][ith] for Elydir, in exchange for access to the libraries. He knows that Faurin’s location and that he has knowledge of where Ith is.
He wears a Ring of Mind Shielding.
Already exhausted, if the characters speak to him, he will show a very brief flash of annoyance which any character who makes a successful check against a Wisdom (Insight) DC 19 will see. He will then politely give the reason to being here is to trade with people in Hearts Faith.
He has bribed the captain to hide him from any patrol ships that move nearby, paying him with an old copy of a common novel.
If he comes to learn who the characters are, he will try to use them and their knowledge to reach the weapon.
Qa’lir and Qa’por 2
The first of the Olinar-Elydir, Qa’lir, travelled to Denaura to overthrow King Morcant and place a puppet in his place.
Qa’lir’s symbol is a rope burning in the middle. The symbol on the shared sending stone with Elydir is shown by a rope burning in the middle under Elydir’s symbol.
The second, Qa’por, is travelling to bring armies of evil creatures to Elydir’s side. It’s unlikely that the characters will find Qa’por, though they will find information that will help them find Qa’por in the future.
Qa’por’s symbol is a shattered chain. The symbol on the shared sending stone with Elydir is shown by a shattered chain under Elydir’s symbol.
Qa’lir and Qa’por share a sending stone, the symbol shows a shattered chain and a burning rope in a circle, tied together.
Treasures
Appendix B
A. Dawnsword Amulet 2
Elydir’s amulet used to bind her to the tower. If this is returned to her, she will be freed from her prison.
This is protected by a ward that prevents those who intend to free Elydir from finding it.
This cannot be destroyed by natural means.
B. Fulcrum. The Staff of Skonarith 2
Skonarith was a tyrant who dominated the world through his magic. When he was defeated, his soul was trapped his ornamental staff so that his powers could be harnessed by the usurper. When the usurper became possessed by the staff, it was split into three parts, splitting its abilities: Ith, the Orb of Empathy; Sko, the Staff of Domination; and Nar, the Braces of Independence.
Recombining the Staff 2
If each of the elements is willing (or is forced), the staff can be reformed from its parts.
Ith, the Orb of Empathy 2
Wondrous Item, Rare (requires attunement by a good creature)
A dark red pearlescent orb, its contents swirling, was split from the Staff of Skonarith. It is kept safe in Lunia, Mount Celestia, out of fear it may hold the evil of Skonarith. If under the right conditions, this can be recombined with the other parts The Staff of Skonarith.
The orb has 3 charges. While holding it, you can use an action and expend 1 charge to cast the detect thoughts spell (save DC 15) from it. The orb regains 1d3 expended charges daily at dawn.
Sentience. Ith is a sentient neutral good wondrous item with an Intelligence of 12, Charisma of 12, and Wisdom of 18. It can read, speak, and understand Celestial and Common. It can communicate telepathically with any creature within 60ft and with any character that is attuned to it. It has hearing and vision out for 30ft.
Personality. When feeling a particularly strong emotion, Ith will sometimes lose control of itself and telepathically broadcast this to other creatures nearby.
Ith is the empathy of Skonarith, what little empathy there there was, but in separation from the rest, it has grown in power.Ith wants to protect others from harm, especially oppression, though, it believes its own powers should only be used against those who dominate.
The orb misses Nar, the Braces of Independence, and wishes to be reunited with the bracers.
The orb is ashamed of its weakness and the hurt that caused to others and that it may end up being by Sko again. If it is asked to use the powers against those who do not deserve it, a conflict will arise between it and its wielder.
Sko, the Staff of Domination 2
Wondrous Item, Legendary (requires attunement)
It has the power to control others.
Nar, the Braces of Independence 2
Wondrous Item, Legendary (requires attunement)
It has the power to shield itself from domination.
Golden oak amulet 2
This amulet was created by Lady Glynlamin’s father and kept in their after his death. It was stolen by Elder Maiele, who cursed it, and she traded it with the Silvatans. The Silvatans gave it to Briid.
The curse allows Elydir to appear and speak to wearer and view the area around them.
Nixignis Gem 2
A thin rhombus shape, this gem amplifies the temperature of anything it’s in contact with, defining its form. Its colour depends on its form.
If the gem is in contact with ice, it will go into cold form. In cold form, the gem glows blue. Unless neutralised, when a character moves within 5 feet of it, it must make a DC 12 constitution saving throw or take 2d10 cold damage on a failed save, or half as much on a successful save. While in cold form, if the gem takes fire damage, it is neutralised for 30 seconds.
If the gem is in contact with a hot surface (too hot for human touch) or fire, it will go into hot form. In hot form, the gem glows red. Unless neutralised, when a character moves within 5 feet of it, it must make a DC 12 constitution saving throw or take 2d10 fire damage on a failed save, or half as much on a successful save. While in hot form, if the gem takes cold damage, it is neutralised for 30 seconds.
If the gem isn’t in contact with ice or a heated material, it will be in neutral form. In neutral form, it doesn’t cause any damage.