Table of contents
Tomb of the Last Rehani 2
Travelling to the Tomb 2
When they reach the path, read out the following description.
The old road was not easy to find — the forest reclaiming it. Plants climb over crumbling sentinels, guarding each side of the road. Plant litter covers the floor and bushes and trees grow from the cracks in the stone.
A successful DC 16 Wisdom check will allow a character to see goblin tracks heading along the path.
For about an hour, the path continues overgrown, getting steeper. It ends where the mountain rises, a collapsed door in front of you.
1. Entrance to the tomb 2
At the foot of the mountain is the collapsed door.
There’s a gap large enough for small creatures at the bottom, or medium creatures with a successful Dexterity check of 15.
Some of the rubble can be shifted instead, with a successful Strength check of 15 but it will cause some of the remaining rubble to collapse and the goblins to be prepared
The rubble can also be climbed over with a successful Strength check of 15.
2. Goblin hideout 2
As you enter the corridor, the first thing that hits you is the stench of goblins. Fragments of the walls and ceilings lie on the floor. Further down the corridor, there’s a small amount of light.
If the goblins know the characters are coming, then the corridor is silent; otherwise, laughter and arguing can be heard.
You can see a chamber ahead. At the opposite end of the chamber there’s a set of double stone doors. In the room there’s crude tables and chairs. A primitive wooden barricades is a couple of feet into the room.
If the goblins heard the characters coming, then the tables are empty (but torches are lit), the goblins hiding behind the barricade and walls; otherwise, goblins are at the tables and chairs, playing cards.
After combat is finished:
Above the door is text that the players cannot understand. There are six orbs, three on each side of the door. Above the door are six lines, each with a dot at the end.
.          .
 \   -.   /    \     /   .-
                .   .
The orbs must be pressed in the right order. Pressing the wrong one resets it but the player who presses the orb, gets thrown back from the wall by 10 feet, taking 1d4 damage.
3. Tomb of King Lunit Rehani 2
Coming through the main doors, an expansive vaulted room is before you. It’s about 120ft long. In the centre of the room a large sarcophagus is built onto a stone platform with steps running up to it. A blue crystalline stone outcrop is right above the sarcophagus, casting weird flickering light from the torches around the room.
Between the centre and each corner are 4 pillars. Each of these 4 pillars intertwine to build up to the vaulted ceiling.
There is a large engraving on the ground in front of you.
Collapsed at one of the pillars is a slashed and bloodied body wearing robes. A backpack lies on the floor before the engraving, its contents strewn.
After two minutes in the room, the stone above the centre of the room flashes a bright blue. Nothing happens for a couple of seconds until the characters can hear the scraping of stone. The sarcophagus lids are sliding open. Skeletons begin to climb out. There are 11 skeletons.
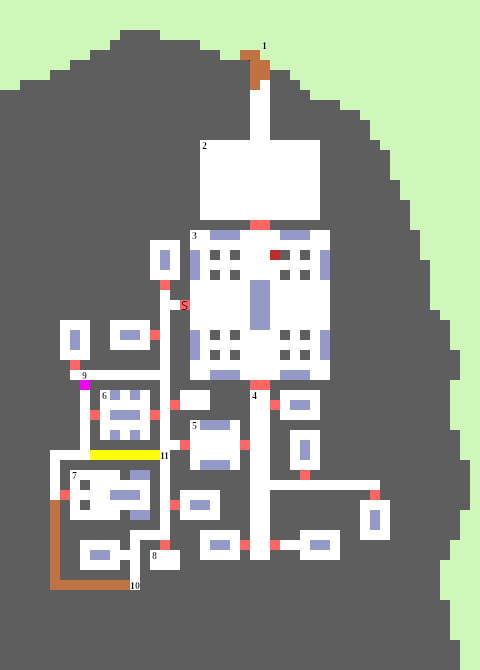
The large engraving shows a simple carved map with each of the rooms labelled; the engravings are in Carnian.

The backpack (and the area around the backpack) contains the following supplies:
- a hammer
- 10 pitons
- 10 torches
- a tinderbox
- 10 days of rations
- a waterskin
- 50ft of hempen rope
- a partially translated copy of the engraving showing:
- the “Lord’s Tomb”
- the “Lord’s guard tomb”
- a storage room
- “The Tomb of the Vanquisher” — the writing seems to have been interrupted.

4. Grand corridor 2
There’s grand corridor carved out of the stone. Torches of a similar design from Elydir’s tower adorn the walls, fire flickering out of them. The corridor is about 200ft long and about 10ft wide. You can see 3 corridors off the left hand wall and 2 off the right hand wall — these are built at odd intervals. The space in here is almost pristine, apart from dust. The grand doors that are at the end of the corridor are open.
The smaller corridors as the characters go along:
- a corridor on the right, it’s about 70ft long.
- a corridor on the left, it’s about 90ft long.
- a short corridor on the right, and then a door
- a short corridor on the left, and then a door
- a short corridor on the right, and then a door
5. 4The Lord’s guard room 2
If the players try to go through this room, 6 skeletons will leave their sarcophagi to attack the players almost immediately.
Giant spider’s chamber 2
Door is stiff to open.
Room full of spider webs, some light filters down from a hole in the ceiling, sarcophagi are closed.
When the players enter, the skeletons will try to get out of their sarcophagi — 3 successfully will do so, the characters can hear the other skeletons scraping to get out.
After about 18 seconds, a giant spider will come to investigate.
The spider and skeletons may attack each other.
Tomb of the Vanquisher 2
Raised sarcophagus in the middle of the room. Arch across the middle of the room. Can see some more sarcophagi past the arch.
Players will feel a sense of uneasy sadness and unfulfillment as they walk into the room. The room feels a lot colder as well.
The players will recognise the text as the same that’s on the stone engraving, and now on their map:
Faurin, Vanquisher of Elydir
If the players open the sarcophagus, they will find a skeleton with an amulet. If they take the amulet, the door will slam shut. A pale white figure will appear between the door and the players.
‘That amulet must stay here,’ it says sorrowfully. ‘I cannot let you leave with it or knowledge of it. I’m sorry. I’m sorry.’
After saying that to the players, it will start to move towards them with its sword out. If the players attack, the skeletons will join Faurin, although the ghost will step out of the fight at the start.
The ghost, gone mad with time, is only focussed on preventing it from ever getting to Elydir and it will be very difficult to reason with it. If the players mention being sent or who they were sent by, the ghost will become violent and impossible to deal with.
The ghost will not be convinced to let the players leave with the amulet and it can only be taken by force.
STORAGE 2
Room large enough to have a short rest in. Has a chest containing mostly rotted/decayed belongings that have turned to dust. There’s 50gp and 2 gems each worth 50gp each.
The door can be shut and barred if the players wish to rest.
Locked door 2
This locked door requires a DC 22 Dexterity check to unlock it.
Collapsed passageway 2
The corridor has completely collapsed, rubble blocking it entirely.
Hidden doorway 2
A successful Perception (Wisdom) check of 20 DC will uncover a door.
* Additional Tombs 2
Each contains 3 skeletons that will attack the players almost immediately. In each of the tombs, the players will find 3d10 gold.